Downloads First:
 | PillarMax Main Pieces [Download] |
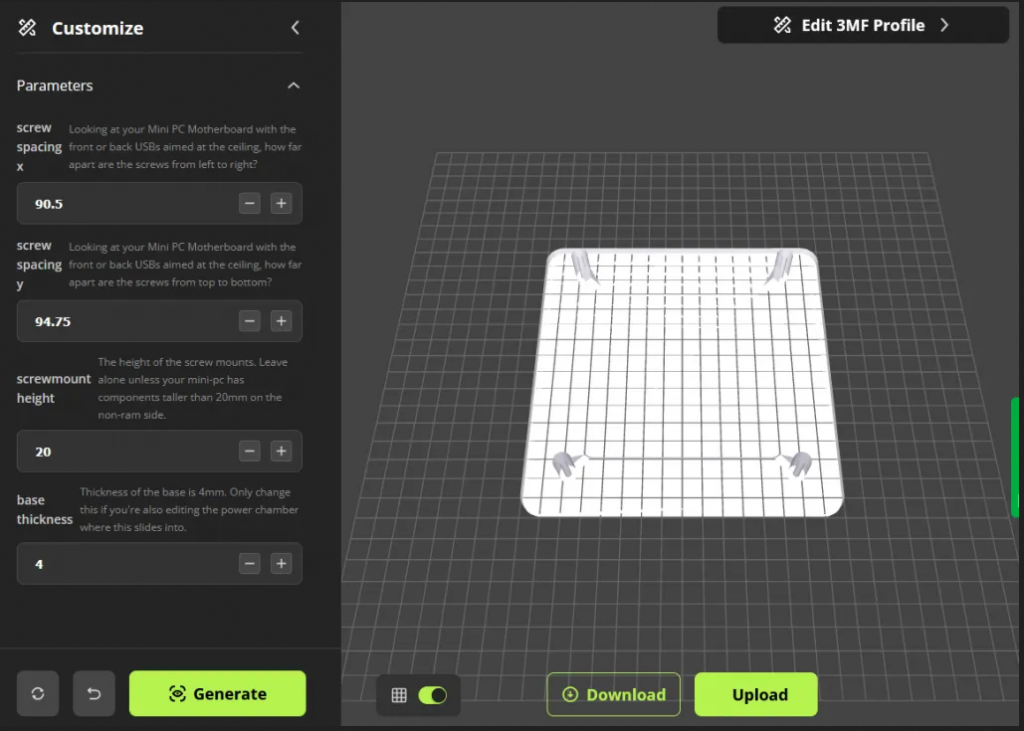 | Automatic customizer tool for creating the standoff plate for your Mini PC. [Customize] (Click “Customize”) Just insert the distance between the screw holes on your mini-pc’s motherboard from left to right, and up to down. Boom. Download. |
 | PillarMax Mini PC SAS Card (full height) Adapter. [Download] |
 | Anti Vibration TPU Screws. [Download] |
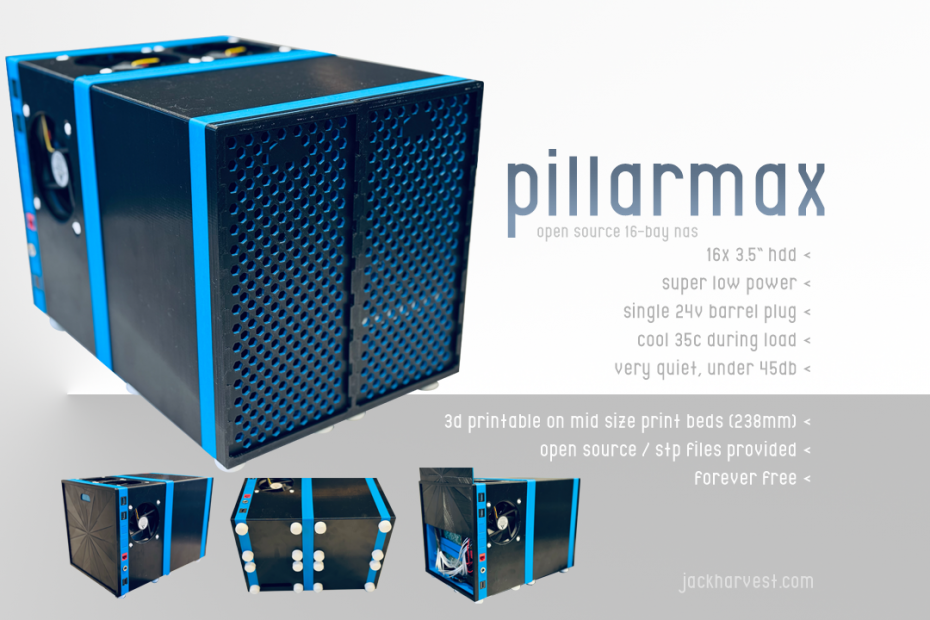
PillarMax takes a 16-bay $5000 Synology-like approach, and delivers a DIY solution into your lap for under $300. Potentially for under $150, depending on how much crap you already own.
Requirements.
- Must sip power.
- Must be economical.
- Must be quiet.
- Must be cool.
- Must be easy to print & build.
I consider Mini-ITX not aggressive enough for power savings, no matter the processor dropped in. Thus, a SOC (system on a chip) solution is required. Laptops and Mini PCs have their processor baked on, and have a far lower TDP than any desktop variant.
Meet the PillarMax.
I was going to start with a purchase sheet, but, I think its more exciting to show what you???re getting first.
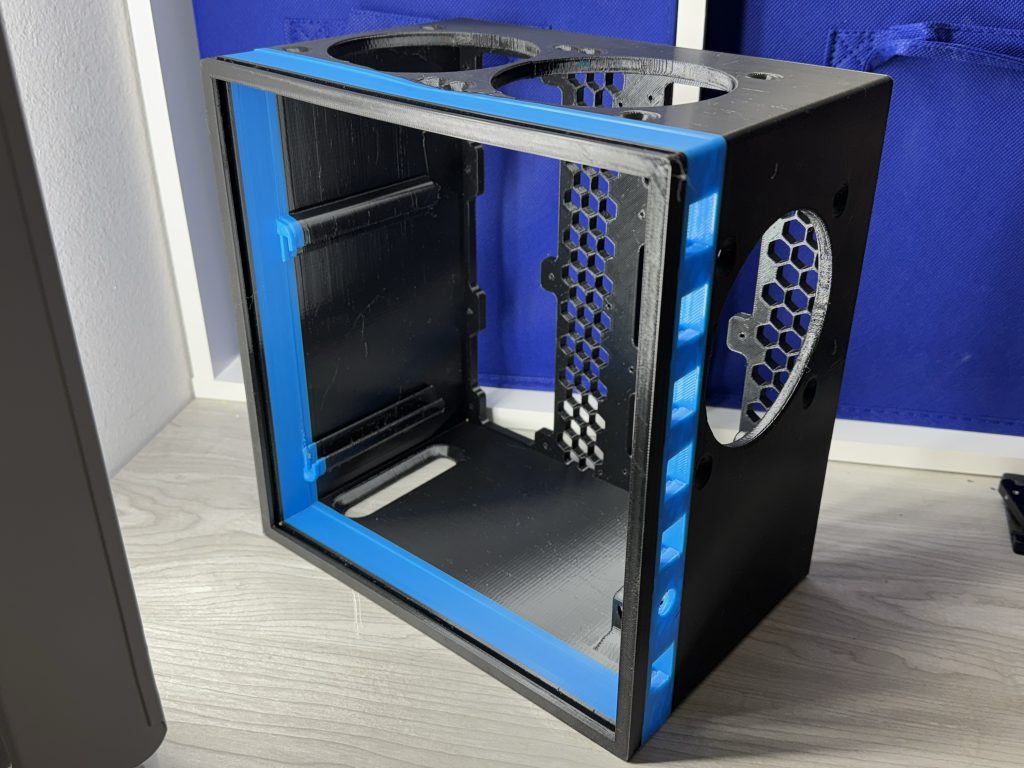
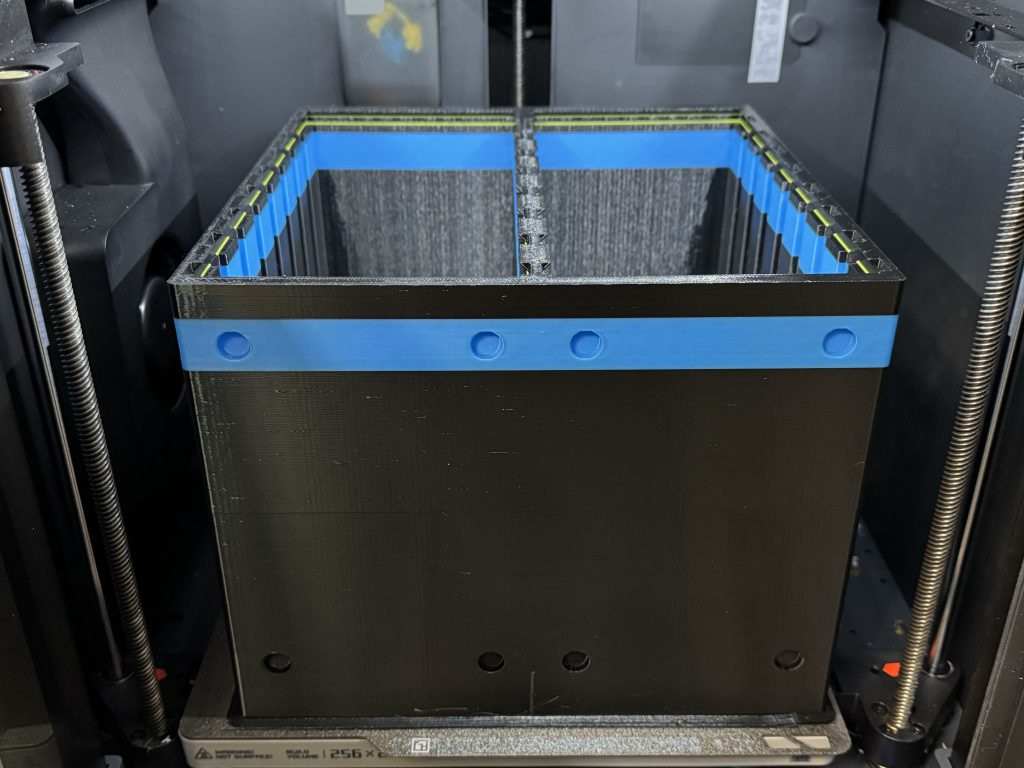
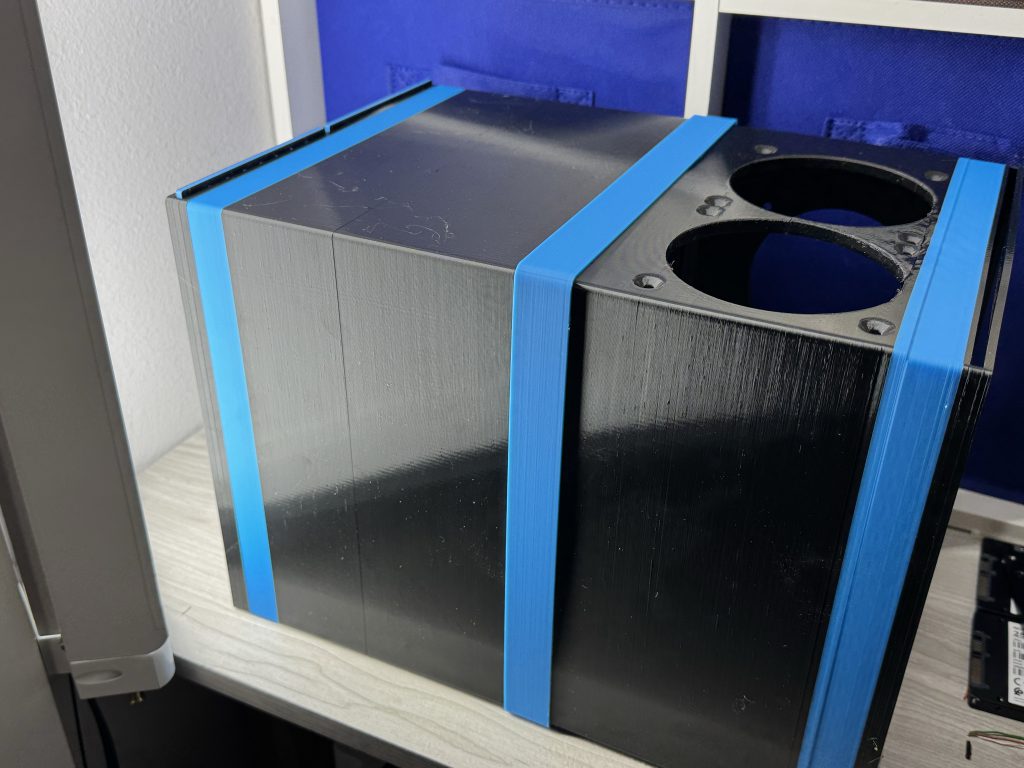
PillarMax, like the PillarPro, is broken down into only 2 main pieces (and their doors): The hard drive chamber, and, the Power Chamber. The ???garage doors??? for each side are different for a reason; We want the airflow coming in across all the hard drives, as this dense of a machine is best suited for negative air pressure.


The design is, I believe, the most dense 16-bay NAS possible! With air gushing through the 3 fans, its easily one of the most thermal friendly as well. Not to mention the power usage… all around, really happy with it, and can’t wait for everyone to be able to join the fun with their old mini pcs (or new!).
The IO up the rear left is in any order you’d like (except the power plug). There are 6 keystone jacks you can use to route your Mini-PC’s connections from. You can just print blanks of course if you don’t see a need, or just want to add those later. At minimum, you’ll want a network port and 5 blanks.
Show me more about these pieces.
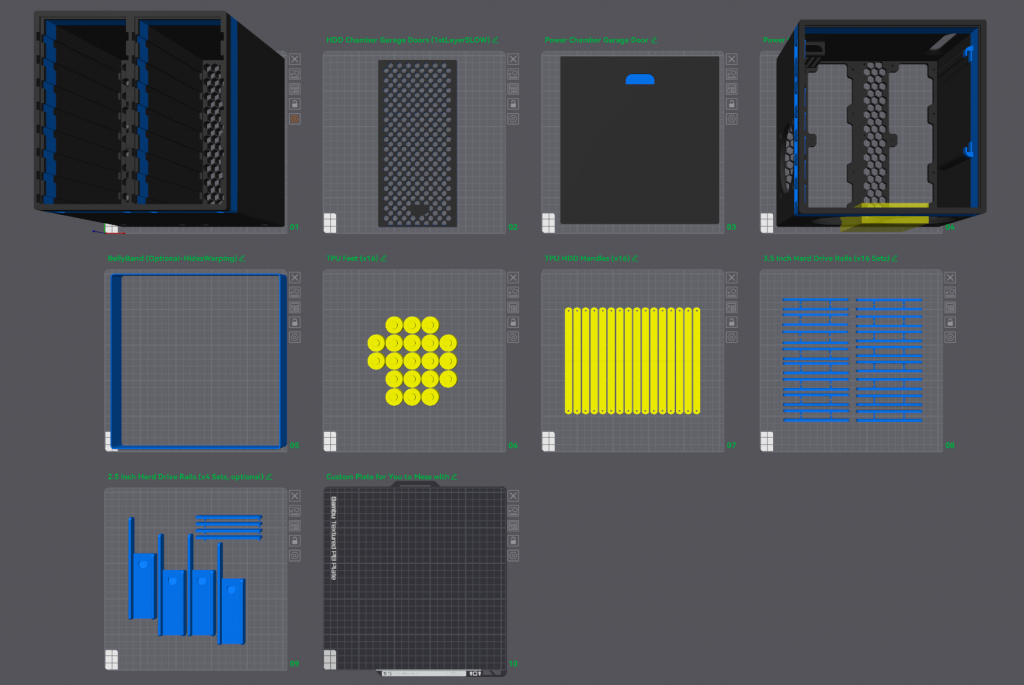
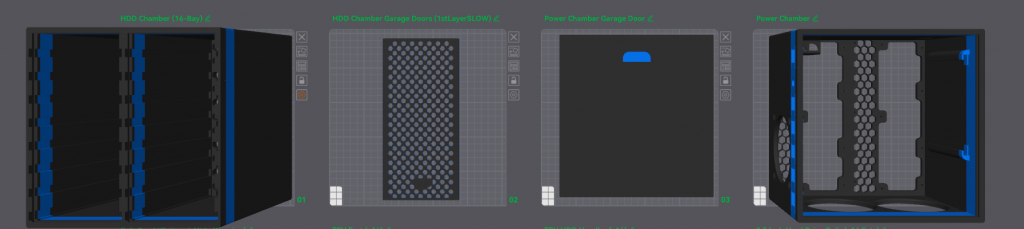
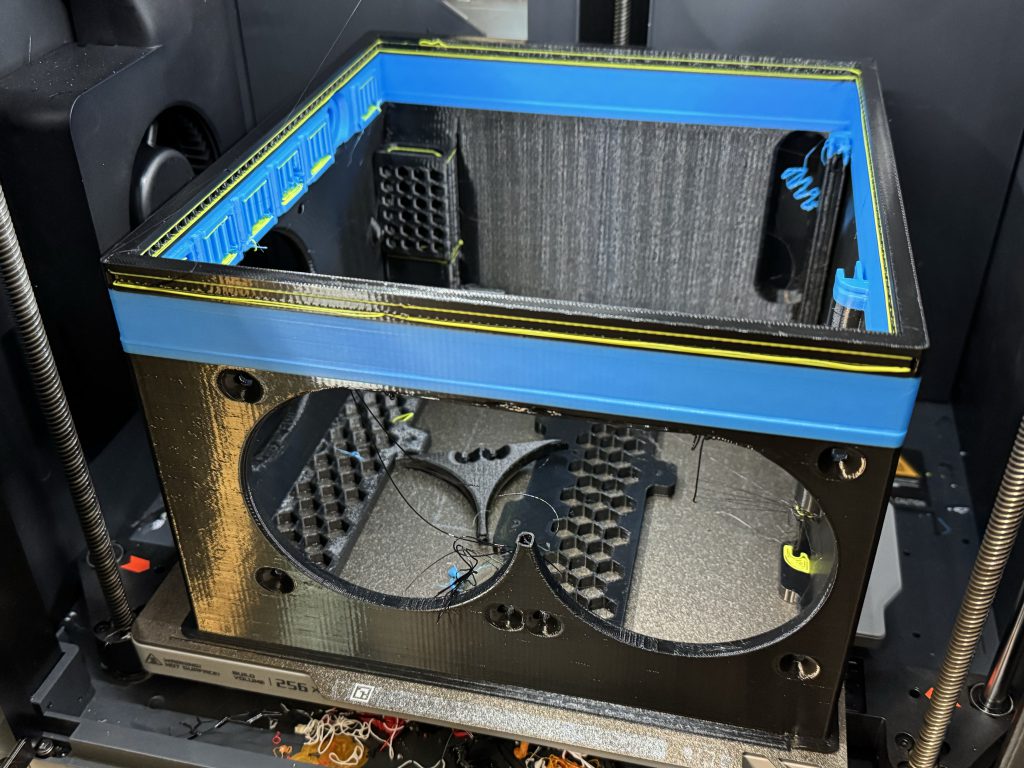
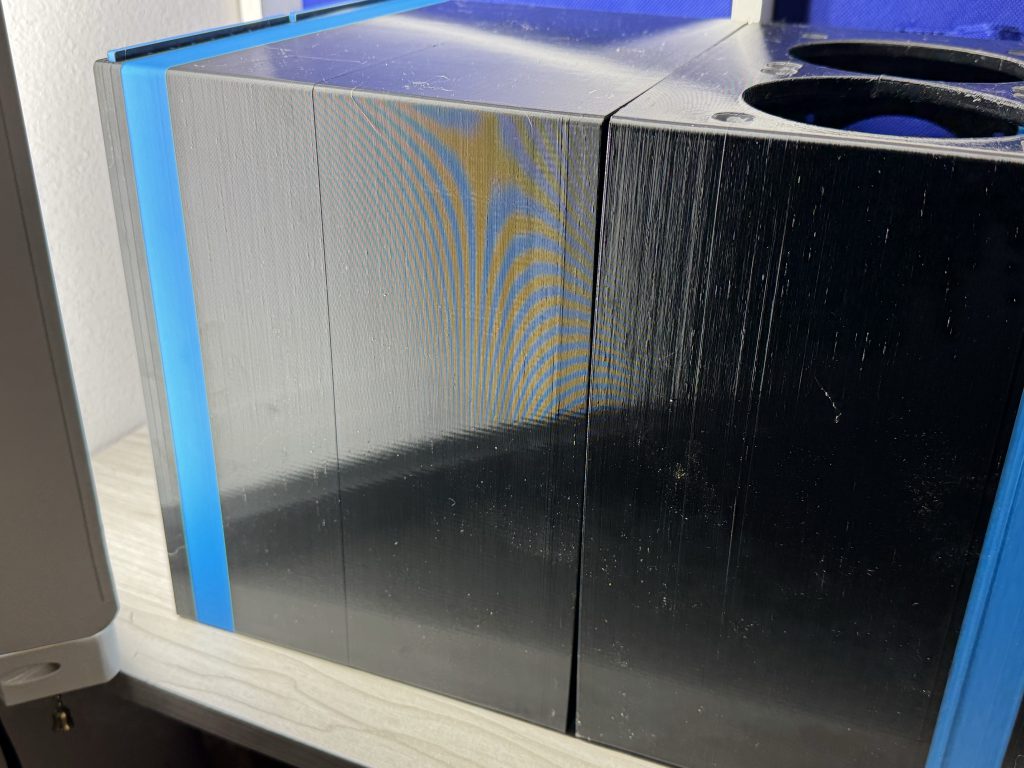
The outside consists of two main components: The hard drive chamber, and the power chamber.

The hard drive chamber with two garage doors installed.
The power chamber has 3x 92mm fans, 6 keystone jacks, 1 dc barrel jack, and provisions to mount your Mini PC, 5V Downstepper, and 12V downstepper. (More on that later, don’t freak out, its easy).
It’s hard to believe, but yes, these two components each fit a print bed. 238.2mm x 230.3mm of bed space is required for the hard drive chamber…
…and the same 238.2mm x 230.3mm for the power chamber.
(Don’t worry about that broken piece, version 1’s strength in that spot was less than it should have been; Bolstered for you though!
3D Printing Note: Both the power chamber and HDD chamber take advantage of using PLA as support for the PETG print. This means, when you remove the supports, they are removed with nominal effort, as the two are allergic to one another. (This also means you should set your purge pretty high (3x or 4x from normal) when swapping between the two filament types; Mixing in the nozzle by any amount will cause that layer to be extremely weak, and sheer right off).
How do they go together?
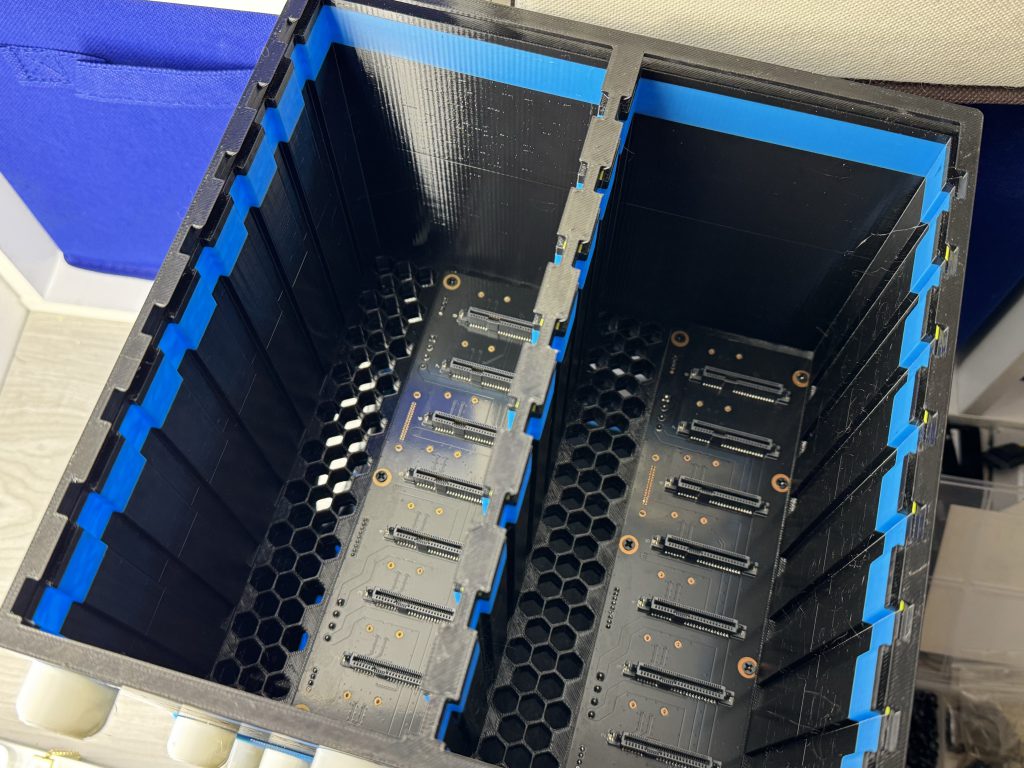
Once the two SATA backplanes are installed (1 8x in the left, 1 8x in the right) with nice short M3 screws, you’ll wonder “why did you advise I use such short screws?”
Simple. From the other side, you’ll use more M3 screws

Here’s an exaggerated look at how these two parts connect to one another. They use the exact same pilot holes that your Backplane screws use.
The backplane is only needing enough threads to get hooked to the plastic.
The other side should use screws that traverse and go all the way through, but not interact with the screws for the backplane.
I suppose you could send really long screws all the way through, with a nut on the opposite side in the power chamber. The thought didn’t occur to me until typing this. Do it however you want. xD
Perfectionist warning:
You do NOT need to use every screw hole. In fact, some of them are terribly placed on account of crudely piping over the measurements from PillarPro. Simply do your best to get 50% of the screws in place.
The bulk of the weight is going to be in the drive chamber. You’ll lift underneath that side. This is just so the power chamber is connected. 😀
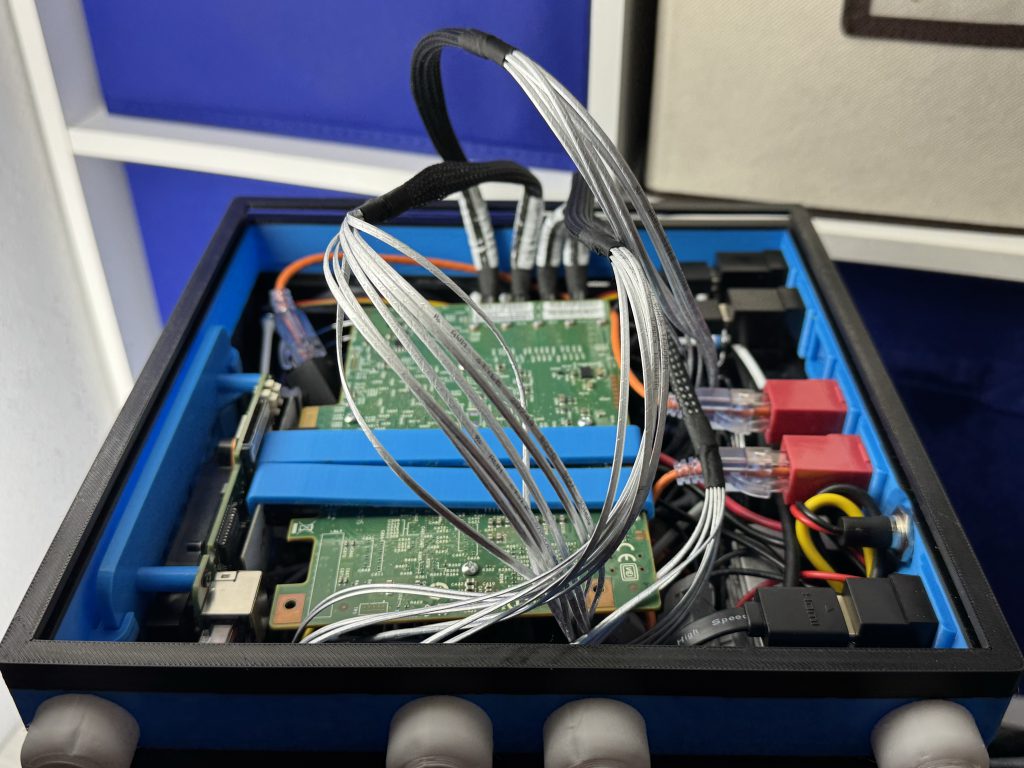
But what about the inside of the power chamber? I’m scared.
Don’t be scared; The inside consists of a few main components: The mini pc of your choice, and some voltage converters (down steppers) to make things the correct voltages for feeding our equipment. Also 3 fans. Easy.
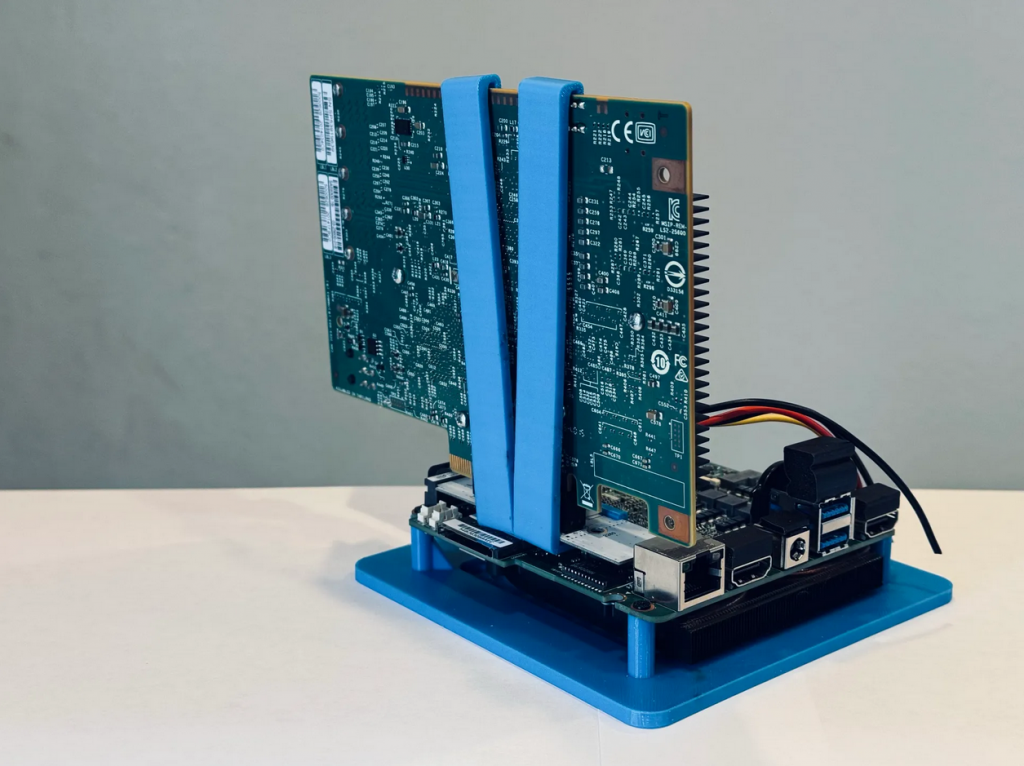
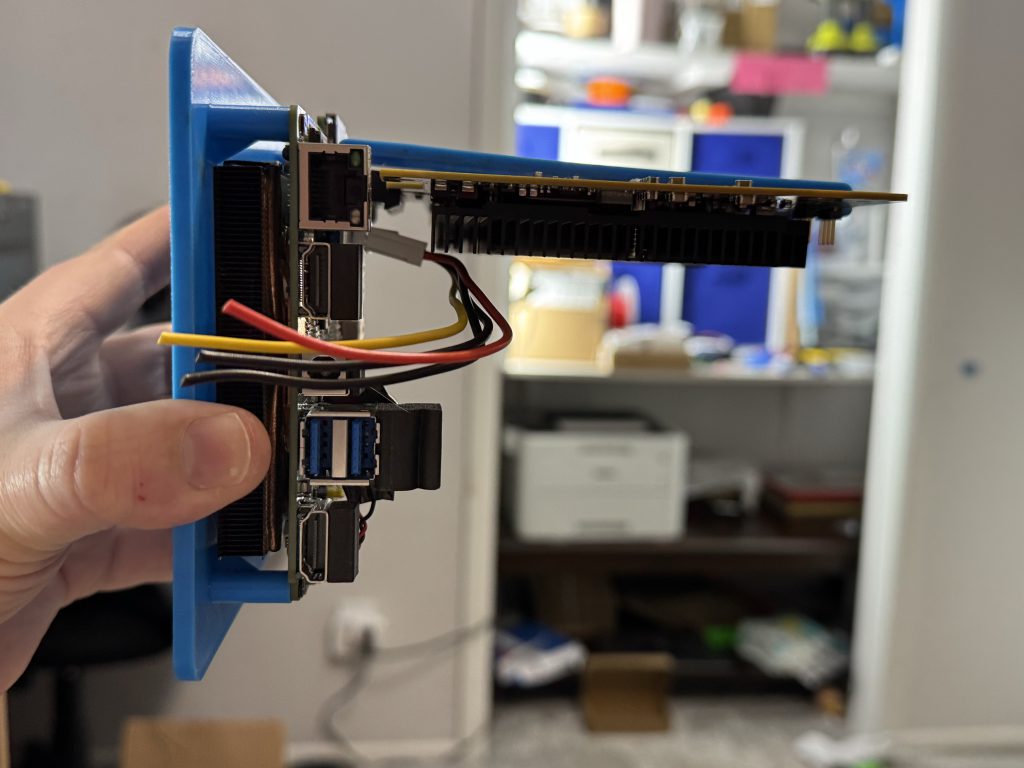
Your Mini PC (well… the motherboard from your Mini PC) resides on customizable stilts [hyperlink pending] which sits on a 5 inch square. This is the mini-PC “standoff board”.
Simply measure the hole distance from left to right, and then top to bottom, pop those numbers into the automated customizer builder for this Mini PC standoff maker, and download your personally tailored print!
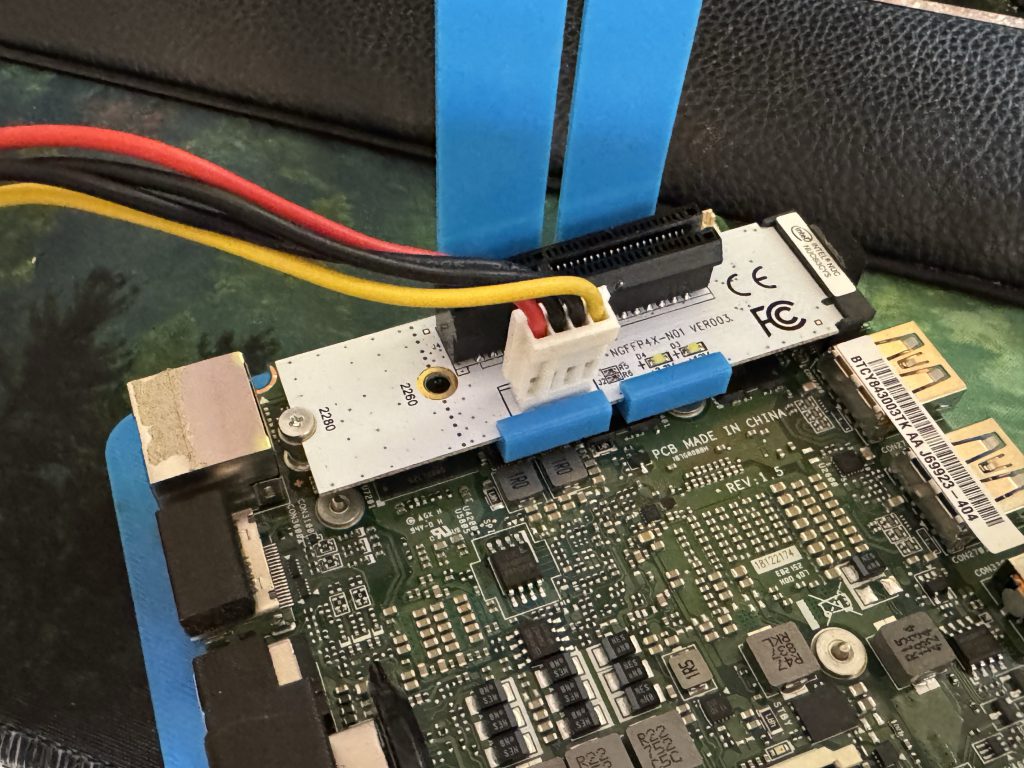
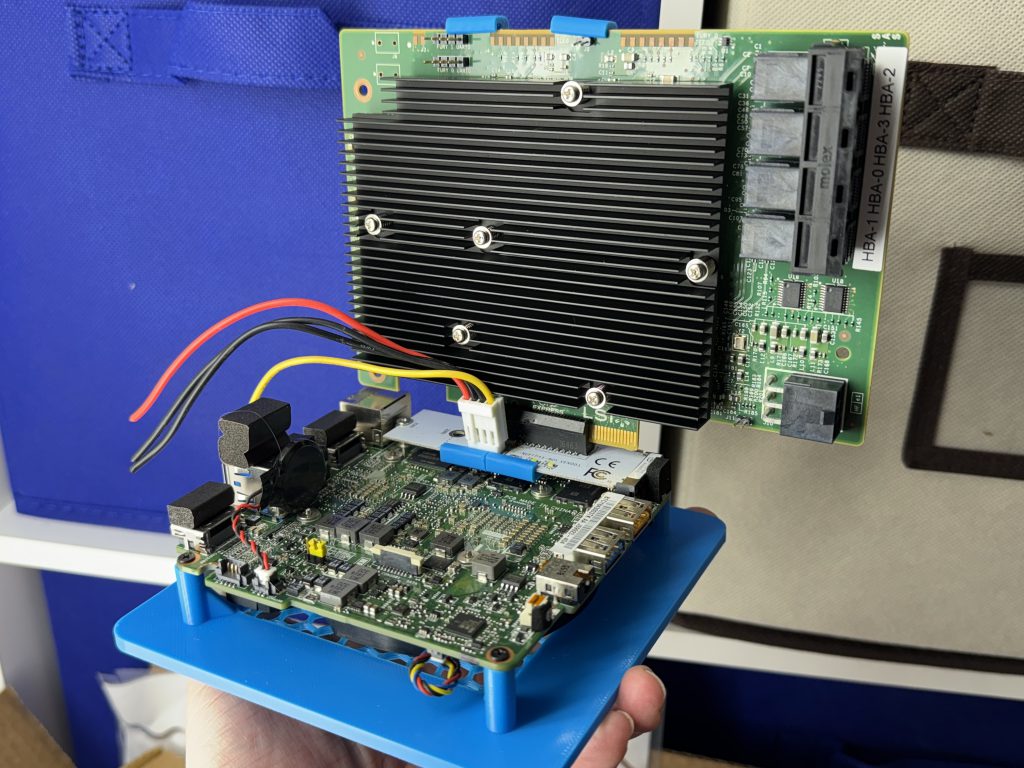
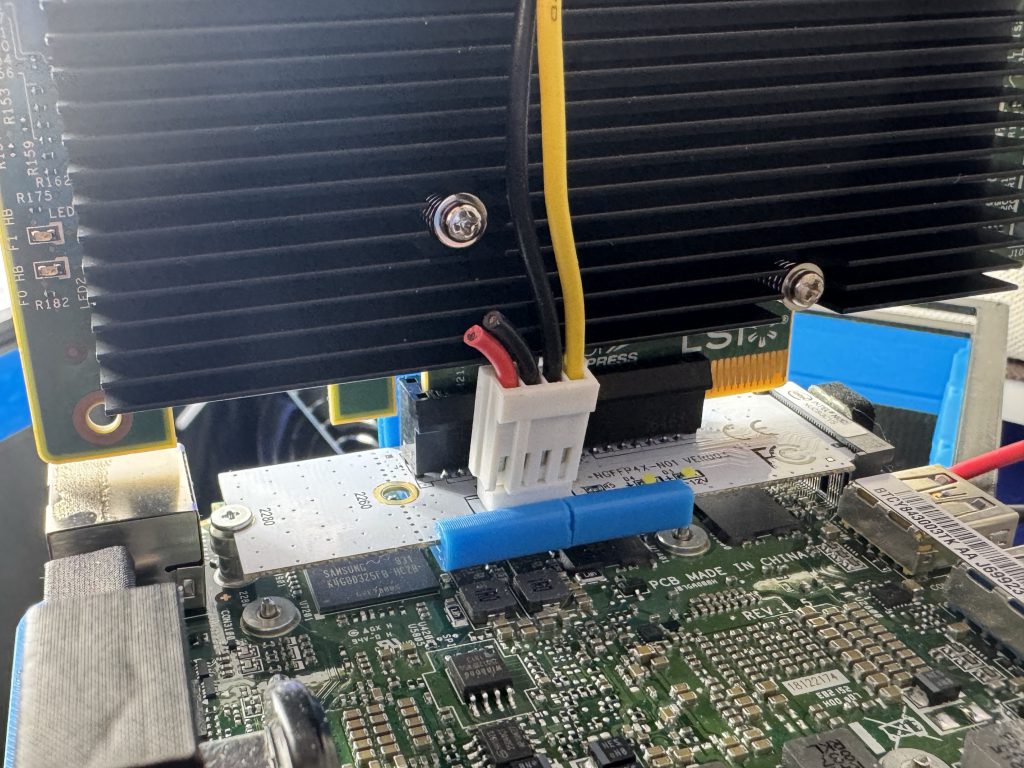
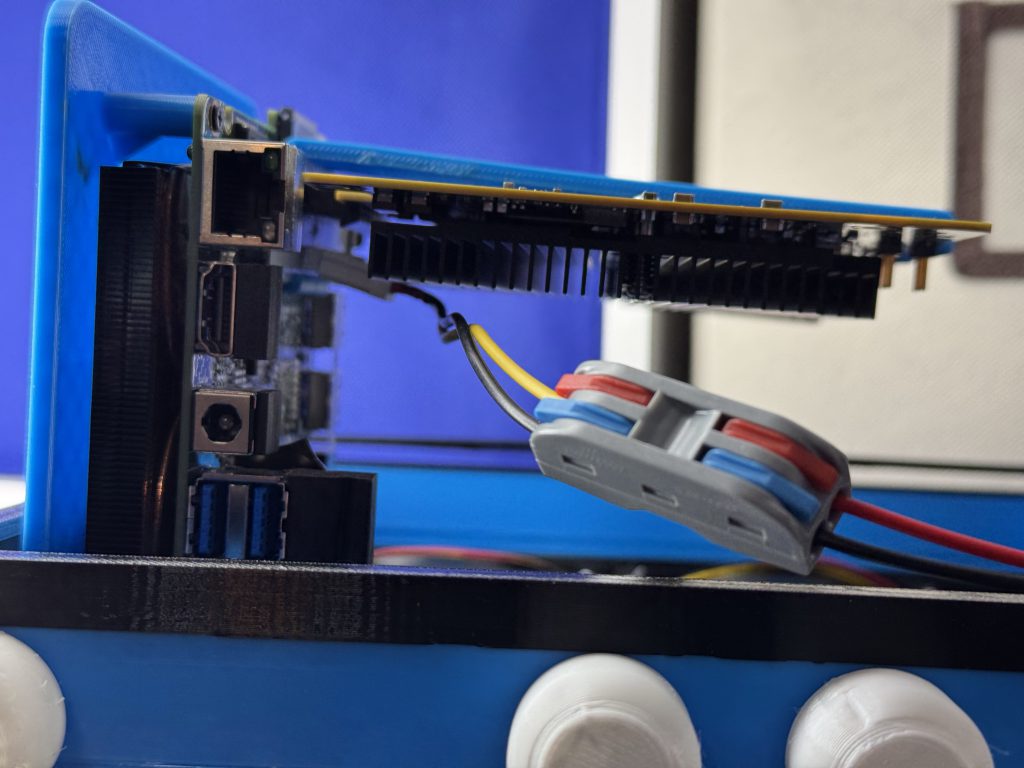
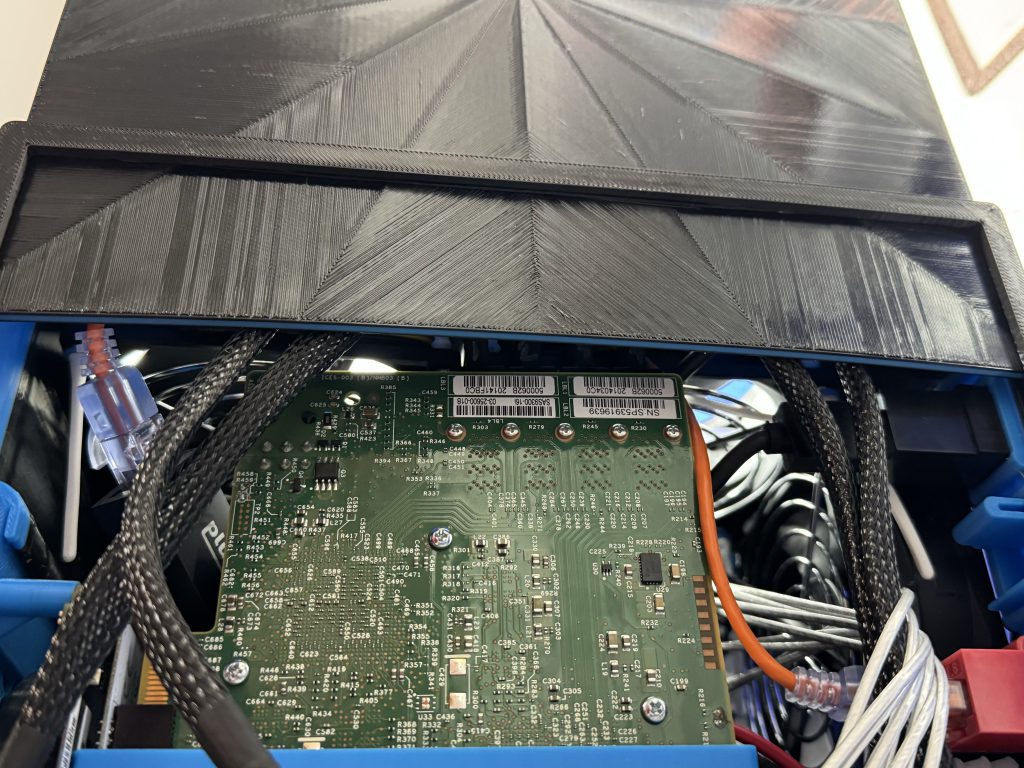
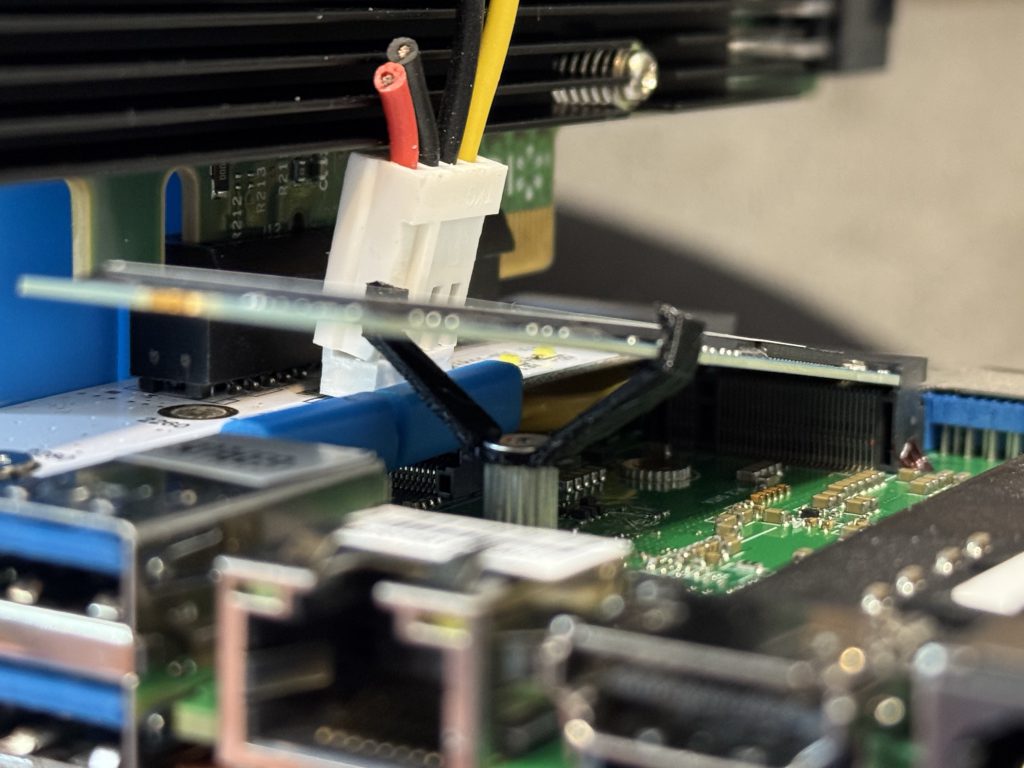
Your M.2 Slot (one that supports NVMe) will become occupied by this $8 adapter. This gives us an x4 motherboard slot to work with (which we’ll put a SAS card into for connecting hard drives).
A mini PC only provides 3.3V to this slot, because they only expect you to be putting in storage. But we’re super cool, and need 12V also.
Here’s the power layout as seen in the image:
[Red5V+ | Black5V- | Black12V- | Yellow12V+]
Thus, we wont need the 5V input lines. In a future step, I’ll simply have you clip them off.
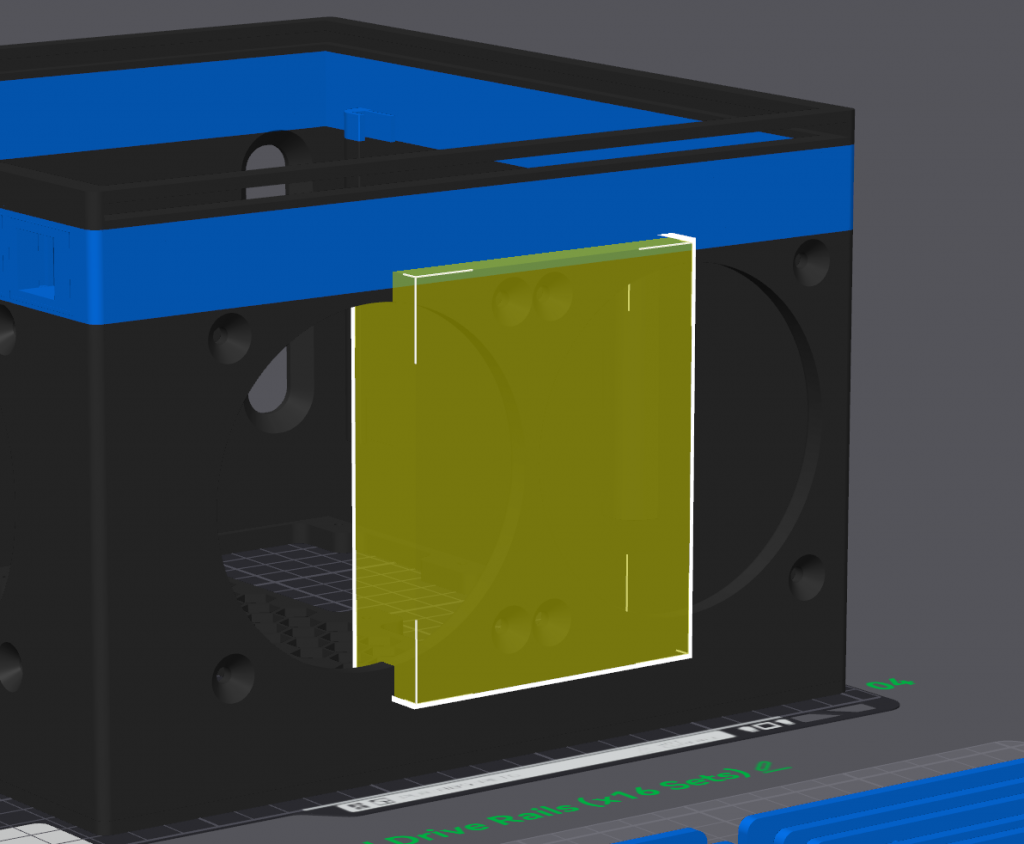
The riser clips that mount to that M.2 adapter board are readily available to download, and come in “low profile” and “standard profile” card heights.
You may need to move the clips left or right depending on your setup and crap in the way on the card or mini pc motherboard.
Overall, pretty simple. You now have the brains of your box ready!
Putting these two units together can cause you to notice that your printer isn’t perfect, and that you had some mild warping.
Thus, a belly-band of sorts is available as an optional download to hide these unsightly warpings.
This is the step to slide this on. There will be TPU feet in the way later.
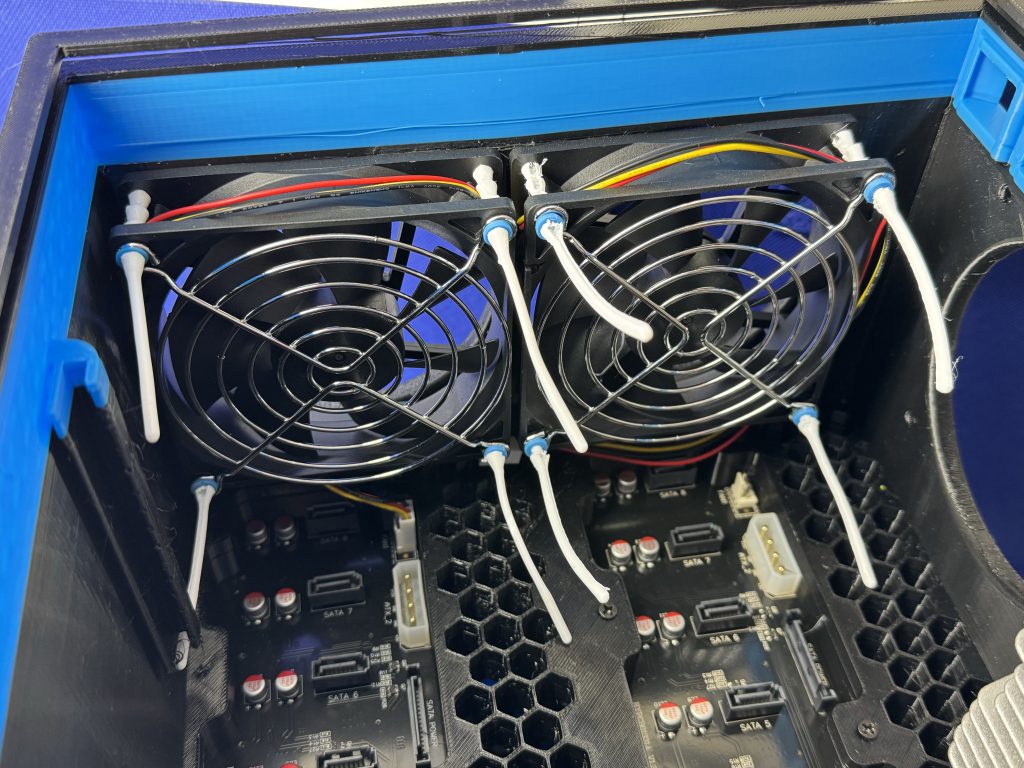
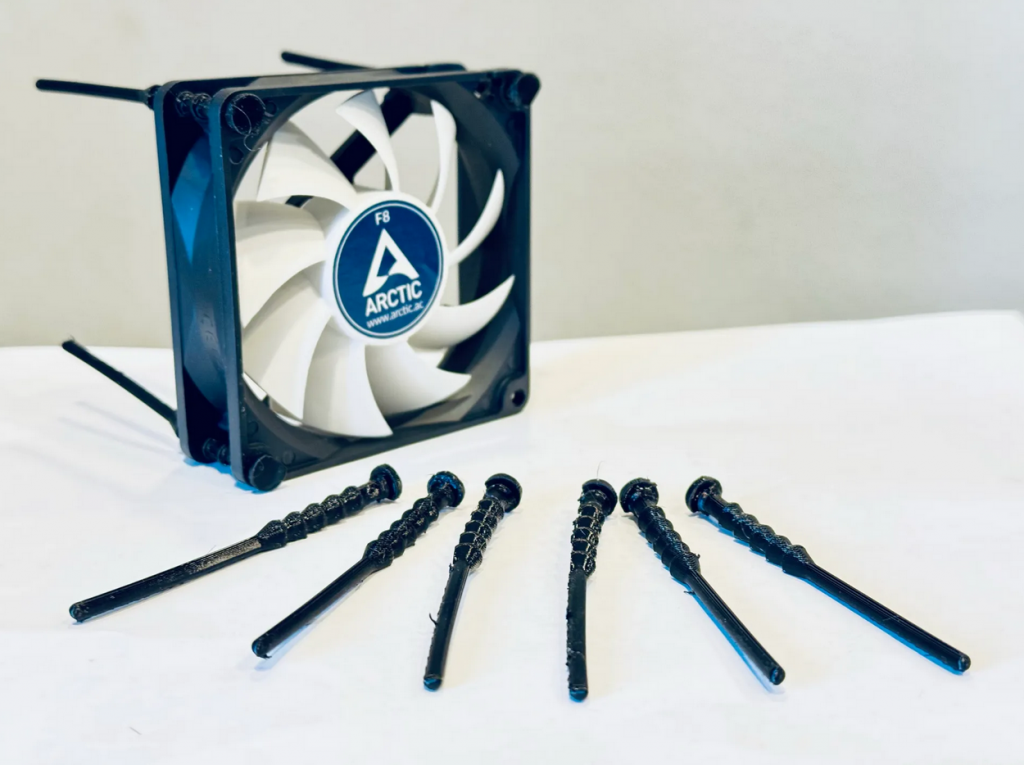
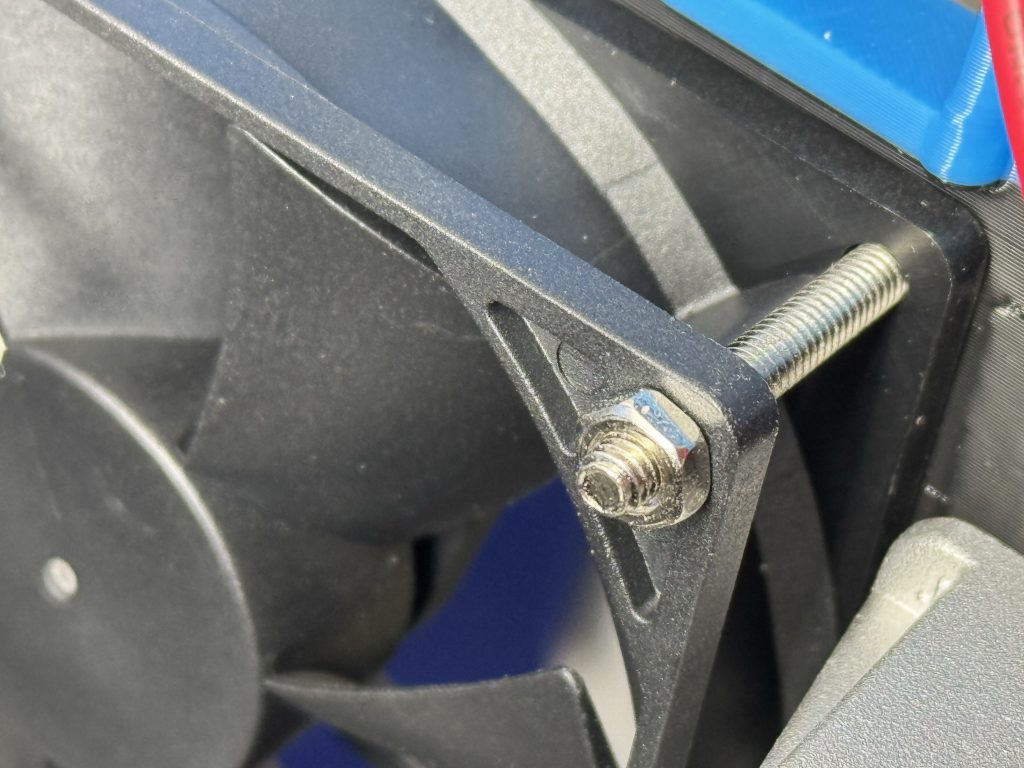
Using the pull-through TPU fan screws (and some printed M3 washers to keep the metal grates on better), install the top two fans in the upper portion of the power chamber.
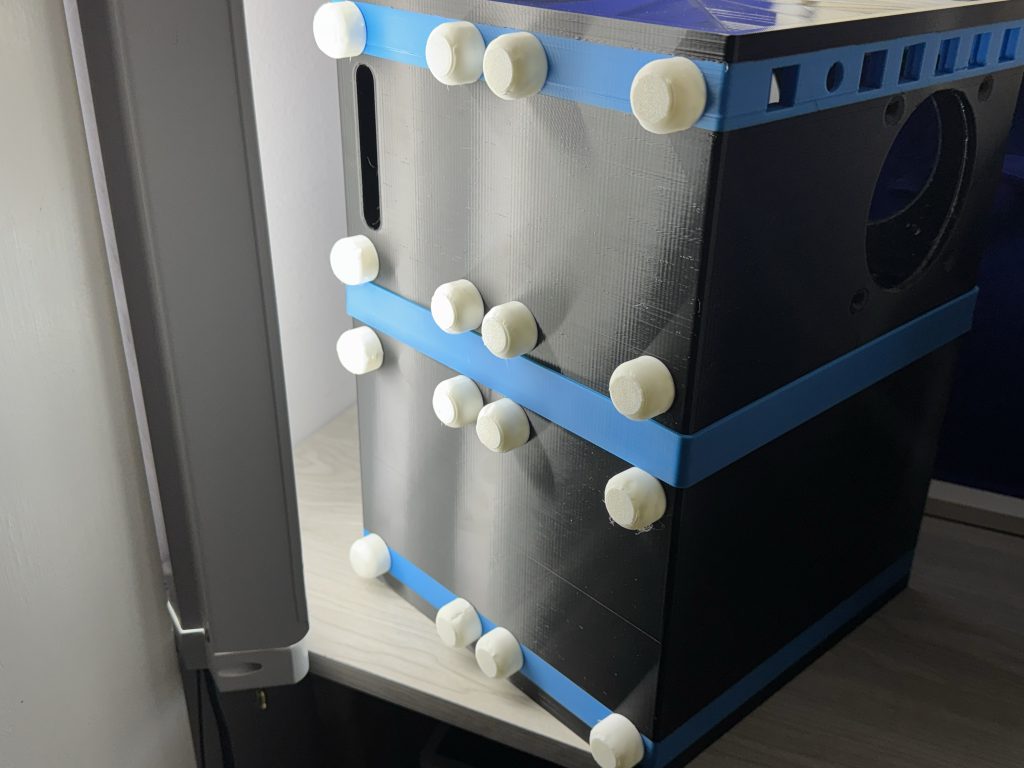
Since you’ve got the TPU out anyway, print the 16 feet.
It was originally less, but, with 16 hard drives inside, this has some genuine heft to it, so the feet were doubled. (note your belly band is now locked in place).
They are pressure fit, but, a dab of super glue is probably not a terrible idea if you plan on sliding it around a lot. (And my TPU is soft so…)

Slide the 5V downstepper into this hole here.
Note the polarity of the terminals.
The input is both 12V or 24V. That’s pretty handy because…
Moving into electrical now. Don’t worry. Hold my hand. Its easy.
…your DC input barrel jack is gonna be feeding in 24V. 😀
The wall plug is a 24V/10A ‘laptop brick’ style power supply. 12V 20A could have been used, but is significantly more expensive and difficult to find than 24V/10A, which gives the same watts.
Before we dive too far into electrical, lets step back and take a look at a simplified diagram for where wires are gonna go.
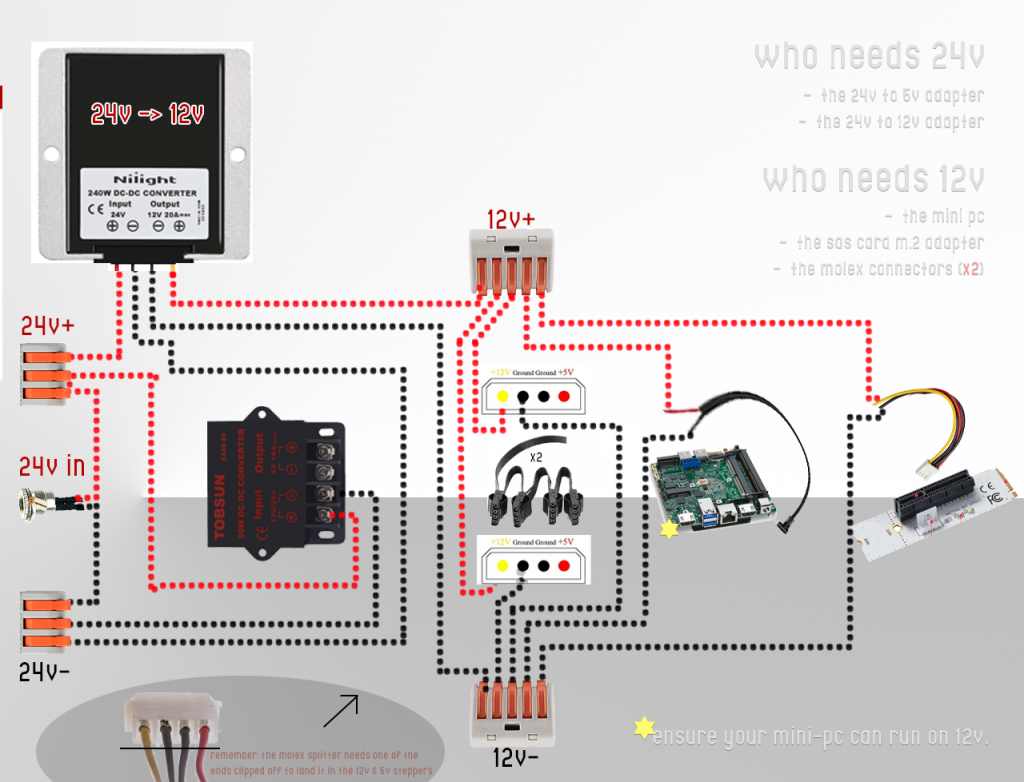
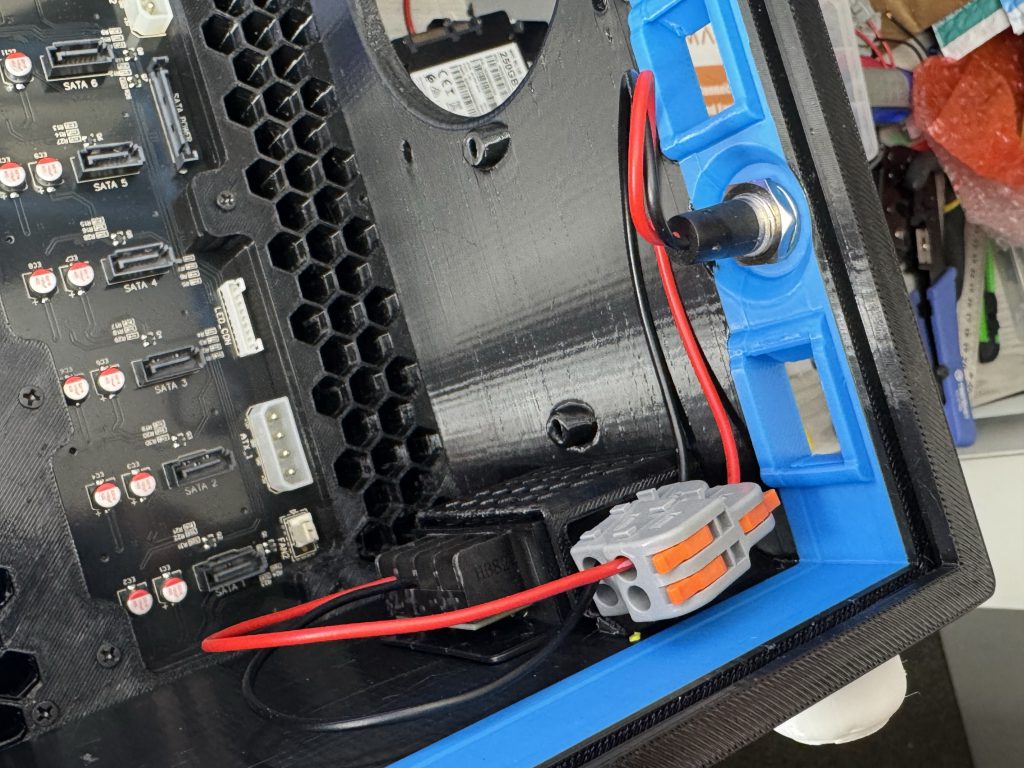
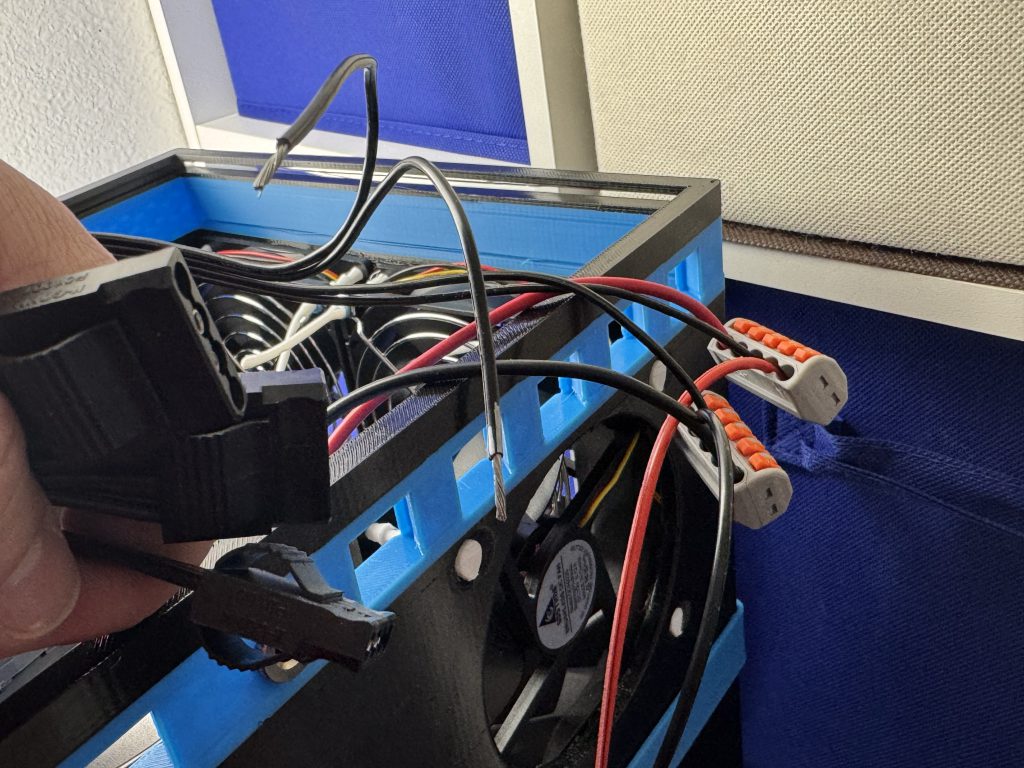
Ok, stop STOP. Don’t freak out. This is actually niiiiiiiice and easy, ok? Look. We’re using these little lever lock electrical wire clamp-down things instead of wirenuts! It’s like electrical for fisher-price babies, you got this. It’s just to spread the electricity to more places that need it, ok?
Here. Photos. We like photos. Lets go slow. (For you speedster electrical wizards, the above diagram is probably enough; Don’t forget the 5V from the downstepper to the Molex, which is pictured below as seen in PillarPro (you just have a second molex in PillarMax; Or you can use a splitter, I don’t care)
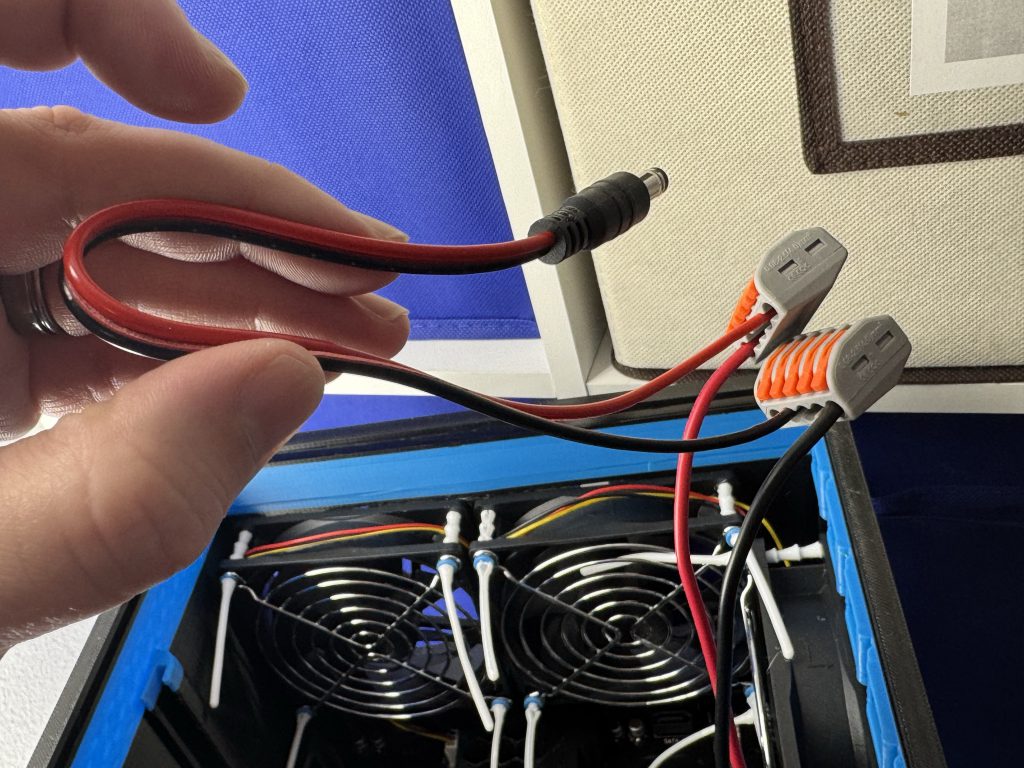
Only two things need 24V from the wall.
…And you already hooked one of them up! (the 5V downstepper)
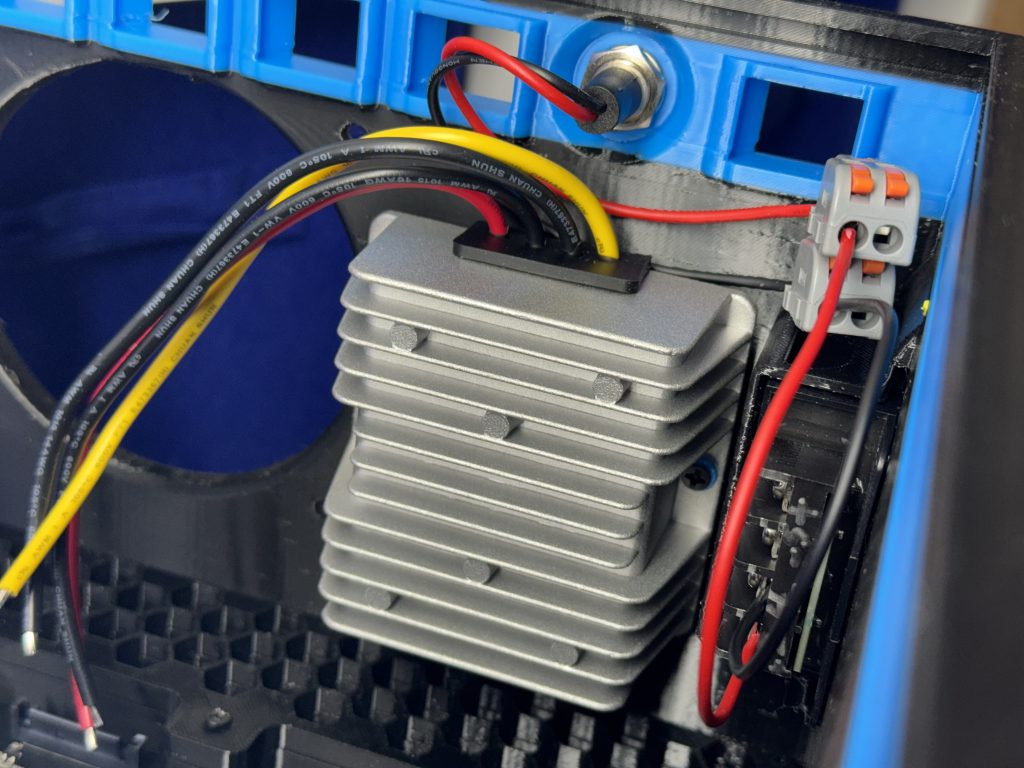
This here is the 12V downstepper. This particular one eats 24V and craps out 12V, which we need for some stuff in here. Do not follow my colors, as your unit may be reversed. Always pay attention to polarity as it is depicted on your hardware. (Author Note: Killed one of these myself building too late at night)
Ok, scary warning complete. Follow the chart above; Plug the 24V+ pigtail from the downstepper into your 3-way 24V+ nut. Do the same for the 24V-. (Not pictured, so you have to look up your polarity)
24V stuff is out of the way. Dude! Already!? Nice.
This is as good a time as any to plug that 3rd fan in with more TPU pull-through screws.
Feel free to plug those fans into the motherboard (using the fan resistor cables from the parts list at the bottom so the fans spin a bit… slower).
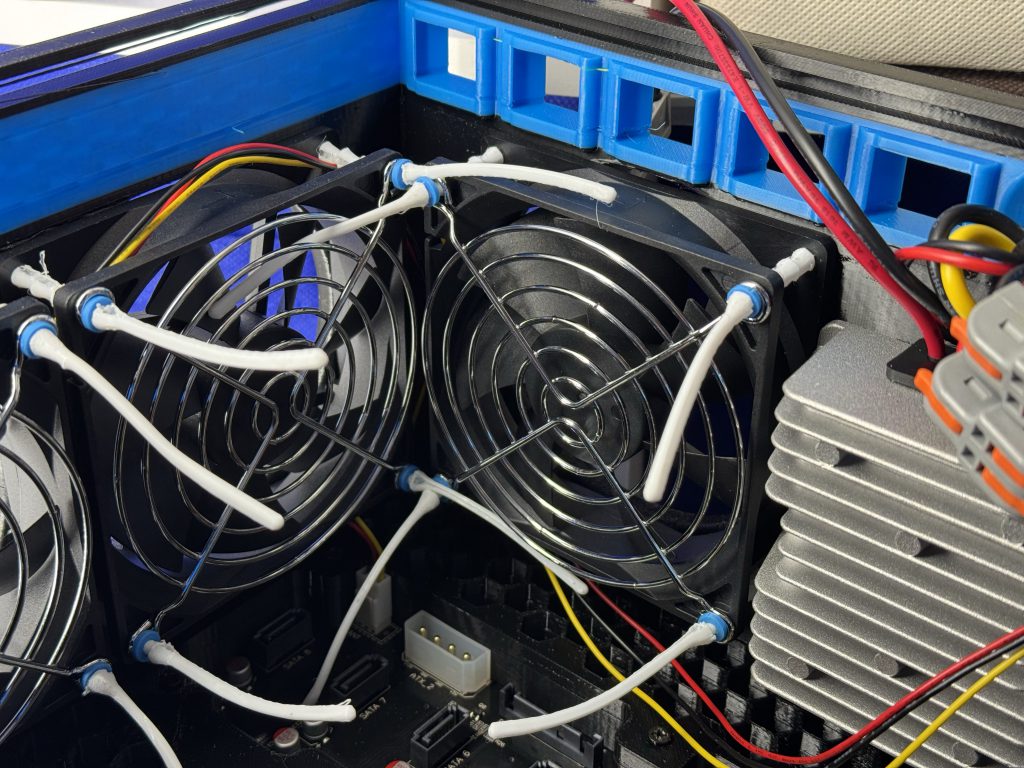
Note: You don’t have to use the TPU screws; If you order the fans I did, they come with some decently long screws and nuts that go all the way through. I just love excuses to print stuff.
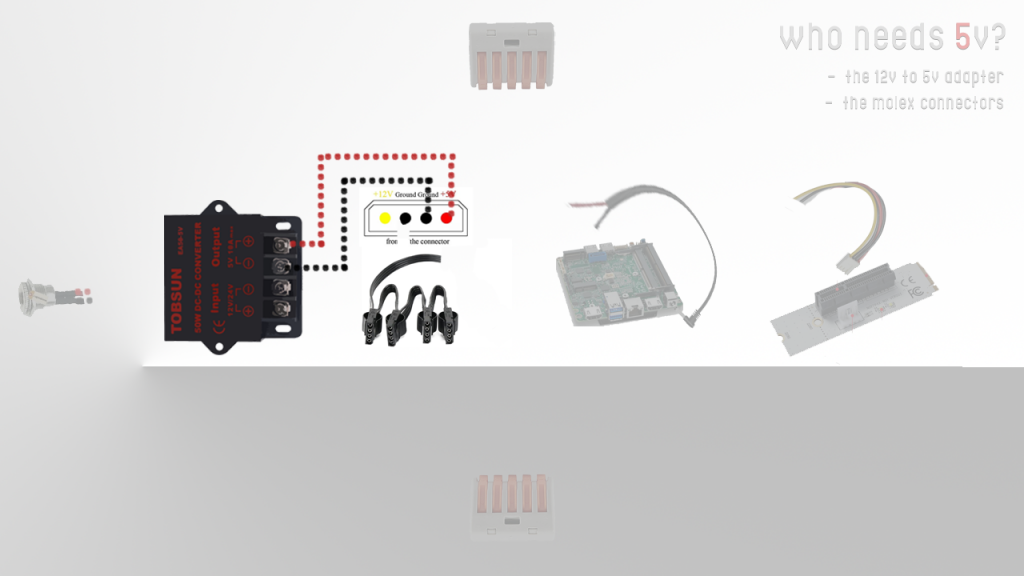
Now, the 5V stuff — erm, thing.
Remember this? Eats 24V and craps out… 5V.
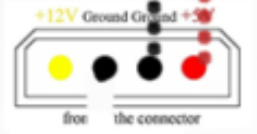
It needs to lead to your molex adapter so we can plug 4 molex into those hard drive backplanes. If it isn’t clear, this end gets snipped off and terminated into the 5V poles here on the downstepper. [5V+ and 5V- from the cable and went to this 5V here].
Ok, only look at the 5V here (in this case red and black… which you can follow with your eyes on the black wires — things get tricky when they don’t color code anything on these Molex cables; Follow the chart above). Don’t look at anything else. I happened to use a splitter here cause I’m a madman, but ideally, you have the left and right on their own, leading back to the terminal individually (screwing down two wires per 5V+ and 5V-). These backplanes support staggered spin-up though, so the amount of draw all at once wont freak out a setup on a splitter (just a single point of failure I suppose).
Only 12V stuff now. See? Easy. Almost done.
Your power cable for your mini PC (which runs on 12V~19V, right? RIGHT? YOU DOUBLE CHECKED THAT RIGHT?) needs 12V. The colors speak for themselves here, thank goodness.
Most mini PCs come with a 19V power brick, but actually support 12V power when checking their documentation. If yours only supports 19V, I highly recommend the Topton N100 or N150 boxes, as they’re cheap, powerful, 6w TDP devices that run on 12V natively. An excellent runner up is the 6th and 7th gen intel NUCs with i3 or i5 processors; ~$50 ebay.
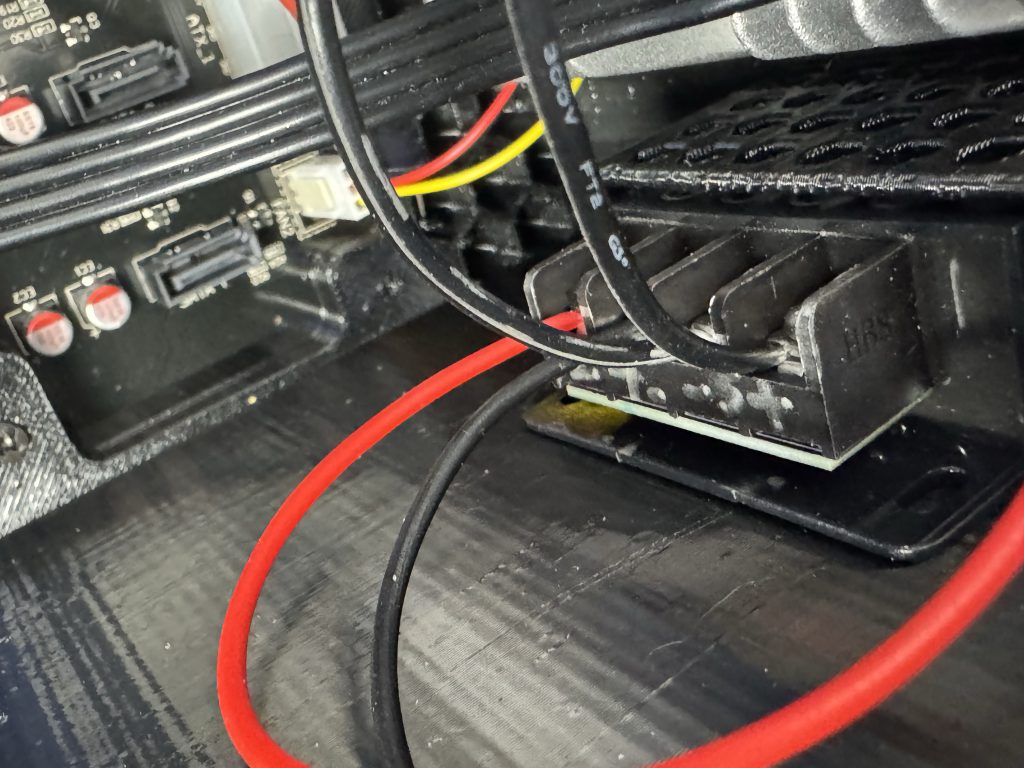
Your M.2 PCIe to x4 slot adapter card needs 12V (yellow+, black- here). These cards come with the 5V line too (red/black), but most (if not all nowadays) cards wont use the 5V (probably why there isn’t a 5V indicator light on this adapter at all, but there’s a 12V and 3.3V).
Since 5V isn’t needed here, I snipped mine.
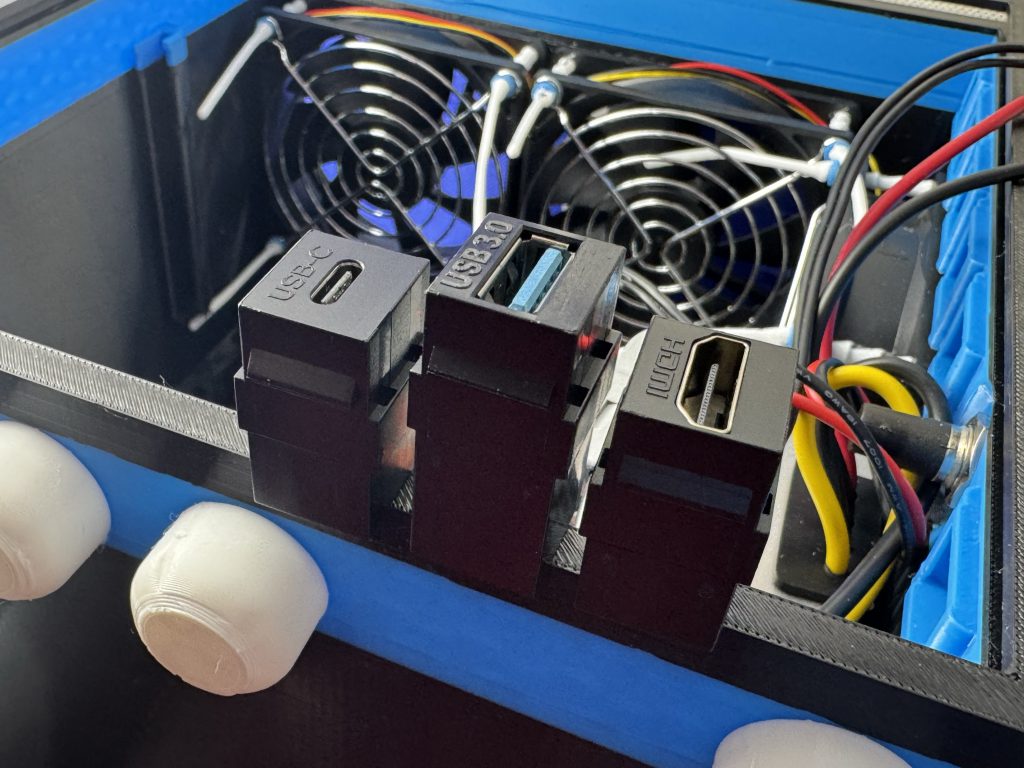
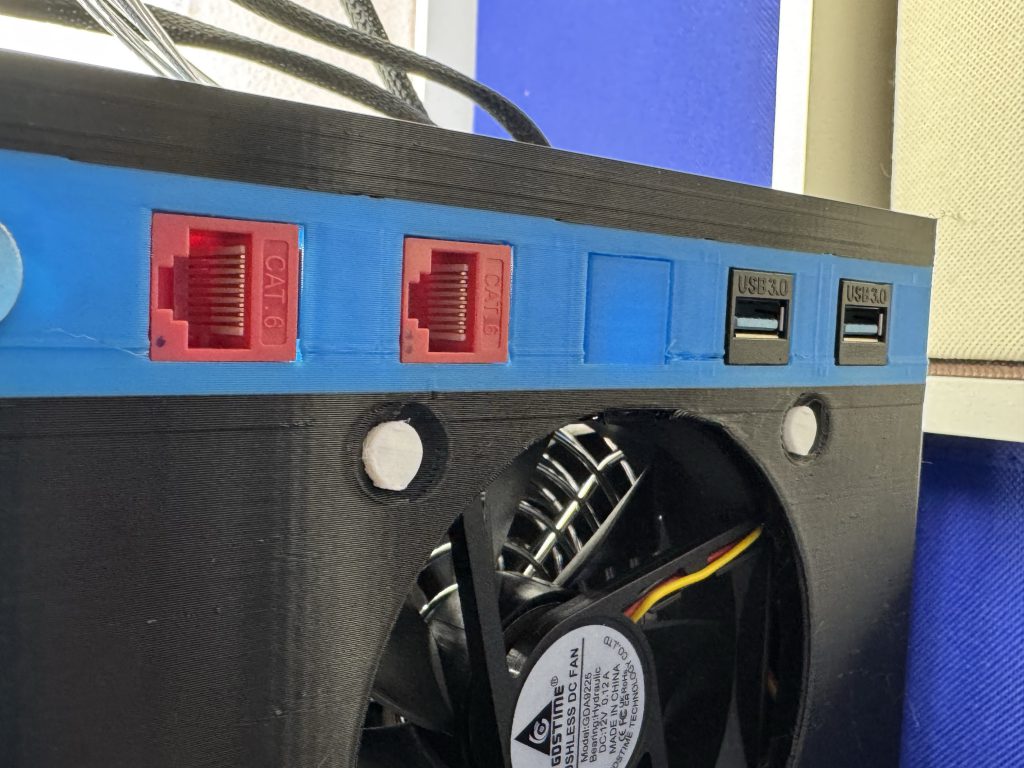
Take a break from 12V for a sec and plug your keystone jacks in that you want. There’s plenty online to choose from (USB 3.0, USB-C, HDMI, etc) — at minimum I recommend an Ethernet keystone jack.
Protip: Even if you know how to punch down your own Ethernet in a keystone, I recommend the coupler; So nice for cable management.
A second glance at that 12V cable on your M.2 adapter while sliding your Mini-PC into place partially (I SAID PARTIALLY; You gotta plug a bunch of crap in first, silly). Actually, pull it out. This was a terrible time to put that in.
Reminder: Plug your 12V+ and – portion of your Molex cables into your 12V+ and – hubs if you haven’t already; (Your 5V is already plugged into the downstepper directly – unlike mine that are floating here in the picture); Peel apart the other two wires for some slack, and put them in your 12V in the proper receptacle).
Be careful. If yours are not colored, both sides will be black. Don’t be confused. Use some color tape or sharpie to keep your path obvious; Use the chart above to determine orientation.
Scary power section is done. Just roll into home plate now!
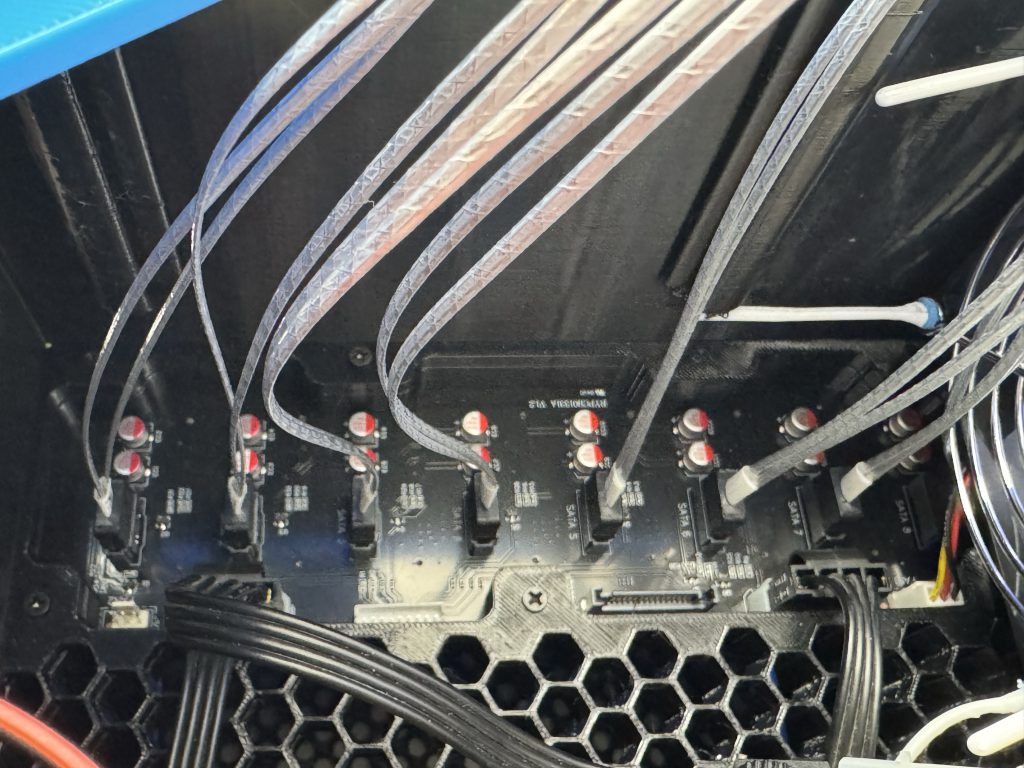
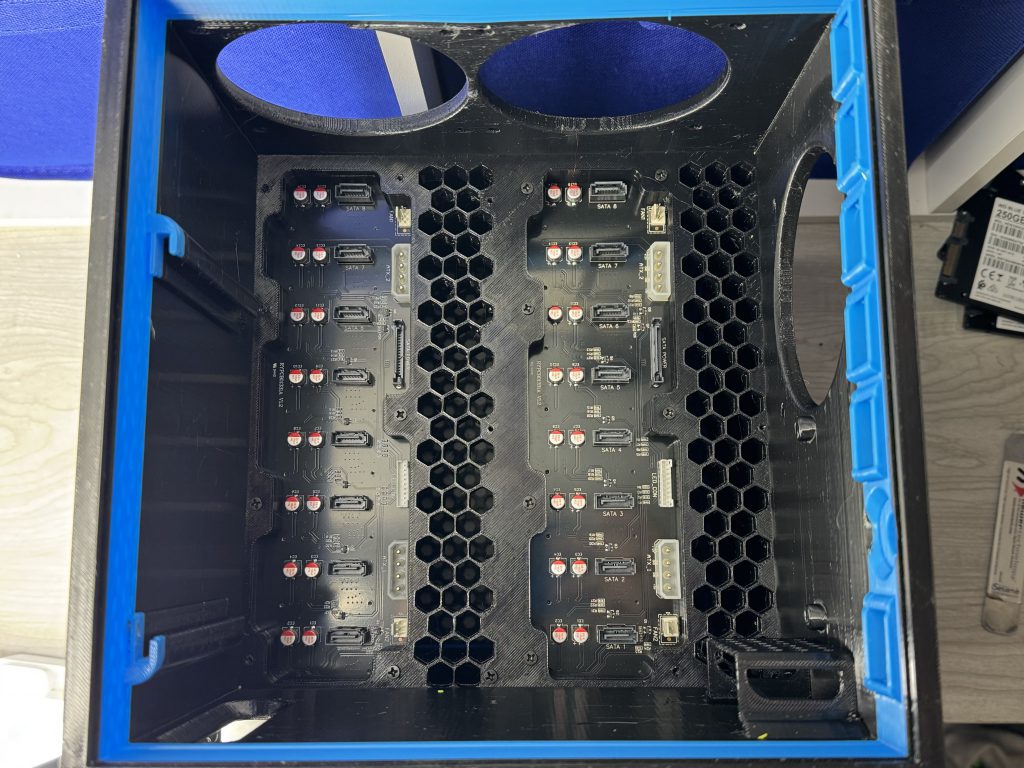
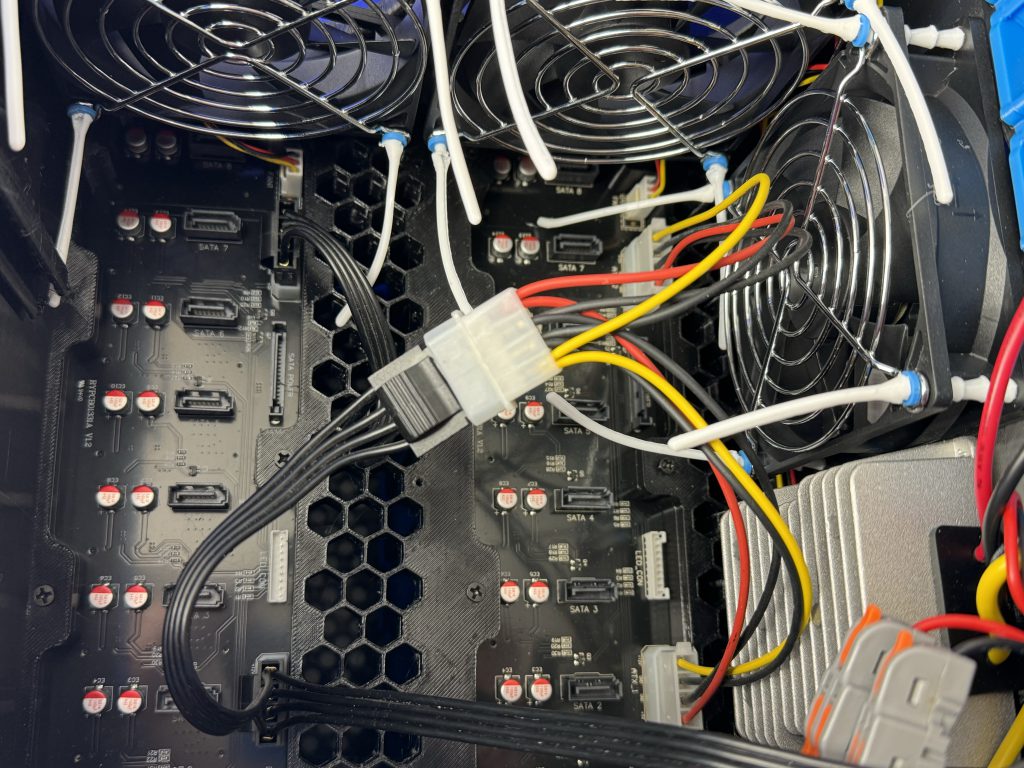
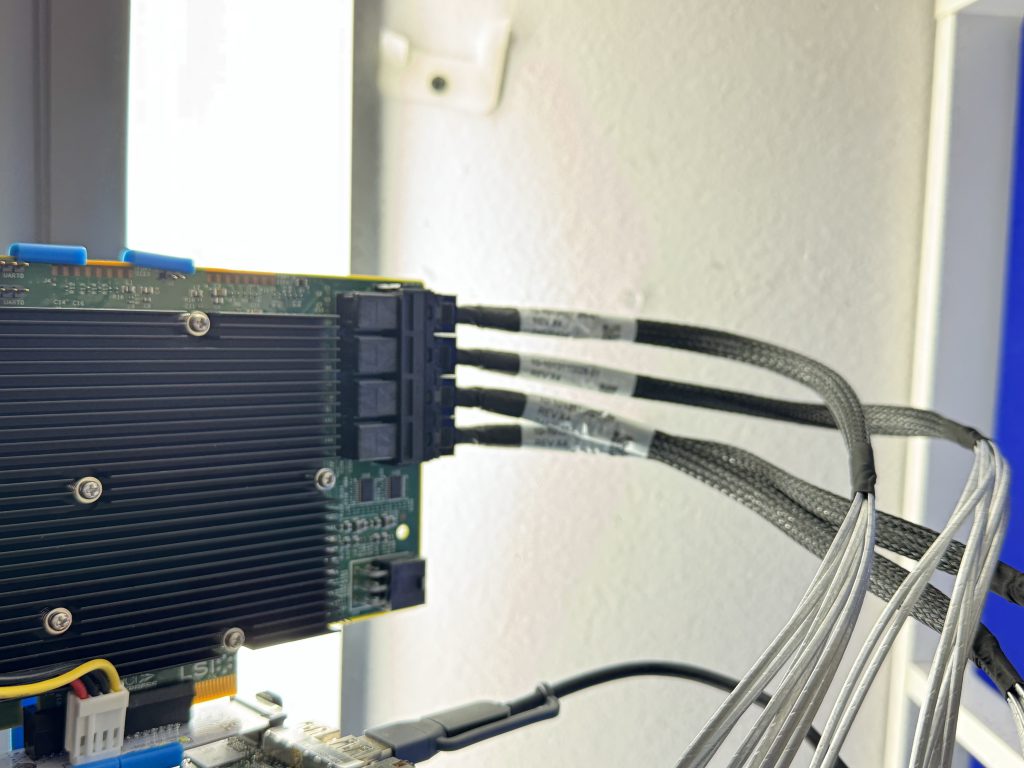
Plug all those sweet sweet SATA ports in. Try to keep some semblance of order here so it looks nice for the spiders that crawl in here.
Now you’re gett’n it. Nice.
(And don’t sweat that hungry looking power port on the bottom right if you’re rocking the 9300-16i. Sources online say “The aux power connector is only needed if the power supply for that PCIe slot is limited to 25W.” — and that’s not us. That 12V has way more than 2A to give, if asked.)
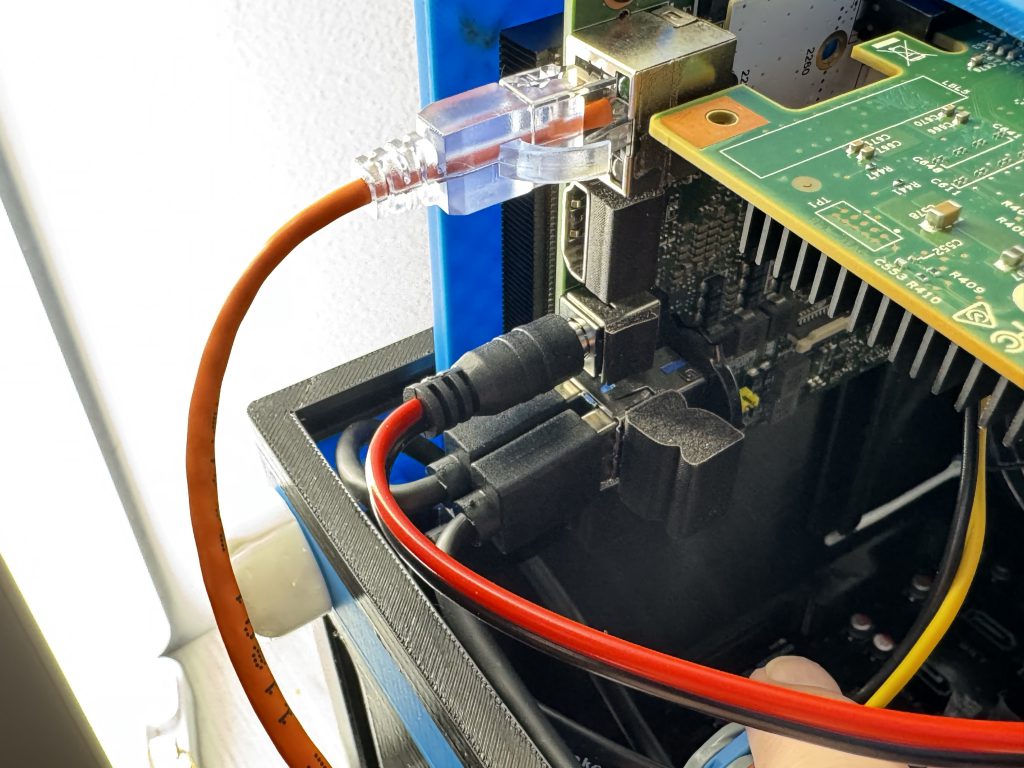
Plug some of that crap in…
- Ethernet
- Power
- HDMI
- Couple USBs
Oooo. Nice.
I didn’t include any blank keystones; Many people have already made these online, and since they’re a standard size, I’ll leave that up to you to print.
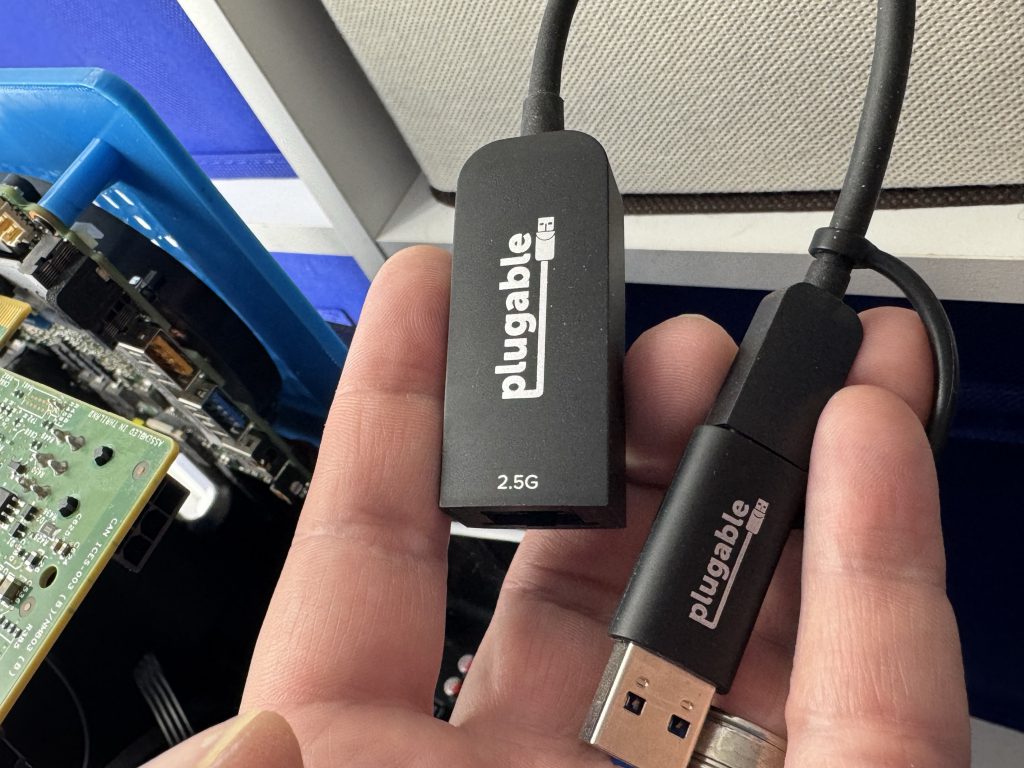
TIP: If your Mini PC doesn’t have a 2.5G NIC, but has USB 3.0 ports, and you’ve got some cheap dumb switches that take advantage of 2.5G (or 5.0G), I really recommend it. Keep it all tucked inside so on the outside you’re just dealing with a normal Ethernet jack on the keystone.
Give those top cables a solid bend, have the left two sata port groups go left, and the right two go right.
Closing the garage door will have some friction. That’s fine. Again, move the cables to the left and right the best you can to relieve as much pressure as you can.
You wont relieve all of it; The fan runs into the cables so you’re stuck with some pressure.
Power. So much power. (And yet, not much at all)
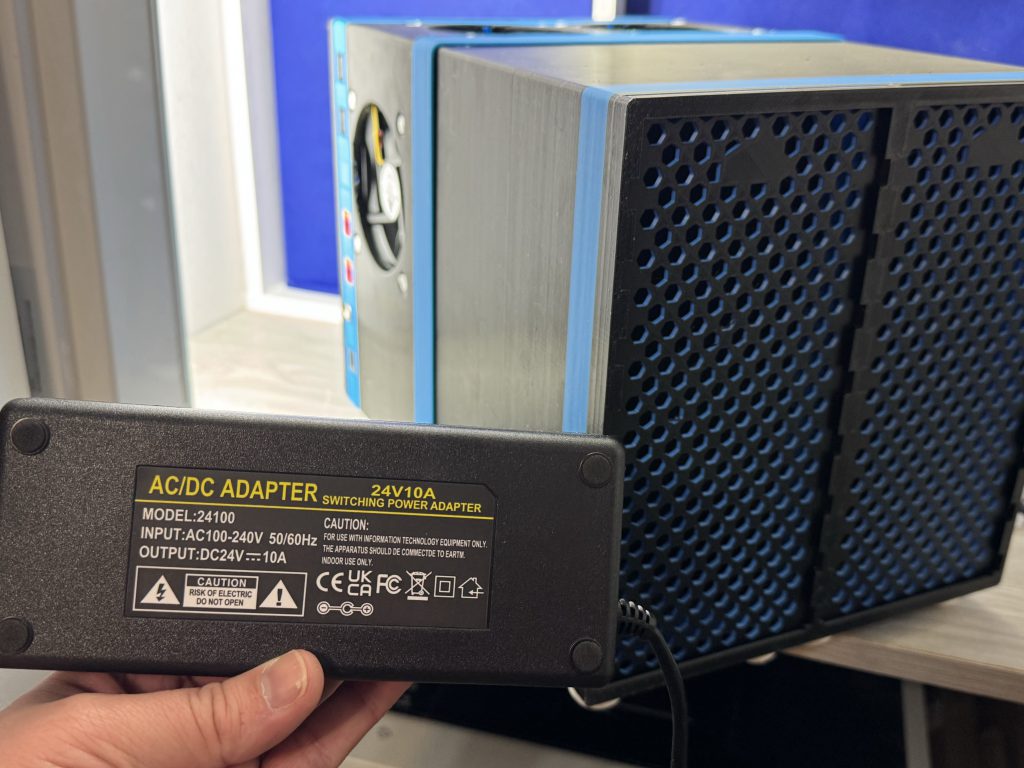
Again, 24V, 10A adapter. It can be 15A. 20A. 30A. Whatever – but less than 10A and our comfortable “ceiling” we want to stay away from at full power is gonna get dicey.
Speaking of, lets talk about power consumption!
I’m rocking a TopTon minipc with an N150 processor (6w TDP, 4/4). A half-loaded PillarMax uses ~90W when running intensive tasking like resilvering. That’s insane good.
For reference, a Synology DS1821+ (an 8-bay desktop model that costs $1000) utilizes ~60w when rebalancing drives intensively.
Ok, wow. Sick. Does this cost a fortune?
PillarPro with 8 bays came in at ~$210 if you had nothing.
PillarMax with 16 bays, I’m proud to say, slides in at $296.17 if you have nothing. Synology’s cheapest 16 bay option is probably the RS2821RP+, which slides in at an eyewatering $3,322.99 on Newegg, only has gigabit NICs on it, and is tinnitus invitingly loud.
Lets break it down! 😀
| Description | URL | Qty | Unit price | Total price | ||
| 5.5 x 2.5 MM DC Power Jack Socket (Male + Female) | Link | 1 | $8.99 | $8.99 | ||
| 12V/24V to 5V 15A Step Down Converter | Link | 1 | $10.00 | $10.00 | ||
| 92mm Fans (two pack) + Grills | Link | 1 | $11.99 | $11.99 | ||
| PC Fans Noise Reducers (Level Blue) | Link | 1 | $2.07 | $2.07 | ||
| Ethernet RJ45 CAT6 Keystone Couplers (5pk) | Link | 1 | $6.99 | $6.99 | ||
| 24V to 12V (20A) Voltage Converter | Link | 1 | $14.57 | $14.57 | ||
| 24V 10A External Power Brick | Link | 1 | $24.99 | $24.99 | ||
| Mini SAS HD to SATA Breakout Cable (0.5m) [8643 4xsata] | Link | 4 | $9.69 | $38.76 | ||
| SAS Card (IT Mode) Supporting 16 drives (like SAS9300-16I) | Link | 1 | $25.00 | $25.00 | ||
| A variety pack of M3 screws | Link | 1 | $8.99 | $8.99 | ||
| Jonsnobo 8-bay Backplane for Hard drives | Link | 2 | $20.00 | $40.00 | ||
| Multi Molex Adapter (for powering Jonsnobo backplane) | Link | 2 | $9.99 | $19.98 | ||
| 1 Foot Ethernet Cables | Link | 1 | $8.24 | $8.24 | ||
| PCI-E 4X to M.2 NGFF Adapter Card | Link | 1 | $8.99 | $8.99 | ||
| 1 to 5 Wire Nuts Connectors | Link | 1 | $8.62 | $8.62 | ||
| 1 to 2 Wire Nuts Connectors | Link | 1 | $7.99 | $7.99 | ||
| 0.5m USB 3.0 A to A Cable ($1.23 \ Optional) | Link | 0 | $1.23 | $0.00 | ||
| 0.5m Hdmi Cable ($1.29 \ Optional) | Link | 0 | $1.29 | $0.00 | ||
| 5pk USB-A 3.0 Keystone Jacks ($4.28 \ Optional) | Link | 0 | $4.28 | $0.00 | ||
| 4pk HDMI Keystone Couplers ($4.44 \ Optional) | Link | 0 | $4.44 | $0.00 | ||
| 2.5Gbe USB Ethernet Adapter (Optional) | Link | 0 | $6.67 | $0.00 | ||
| MiniPC: NUC6i3SYB / SYH / NUC7i3 etc | Link | 1 | $50.00 | $50.00 | ||
| $0.00 | ||||||
| Notes: | Subtotal | $296.17 | ||||
| – Drives are also required. (duh) | Adjustments | $0.00 | ||||
| $296.17 | ||||||
FIN
Ok, but, bonus material, right?
I subscribe to r/minilab and I’m hoping that maybe…
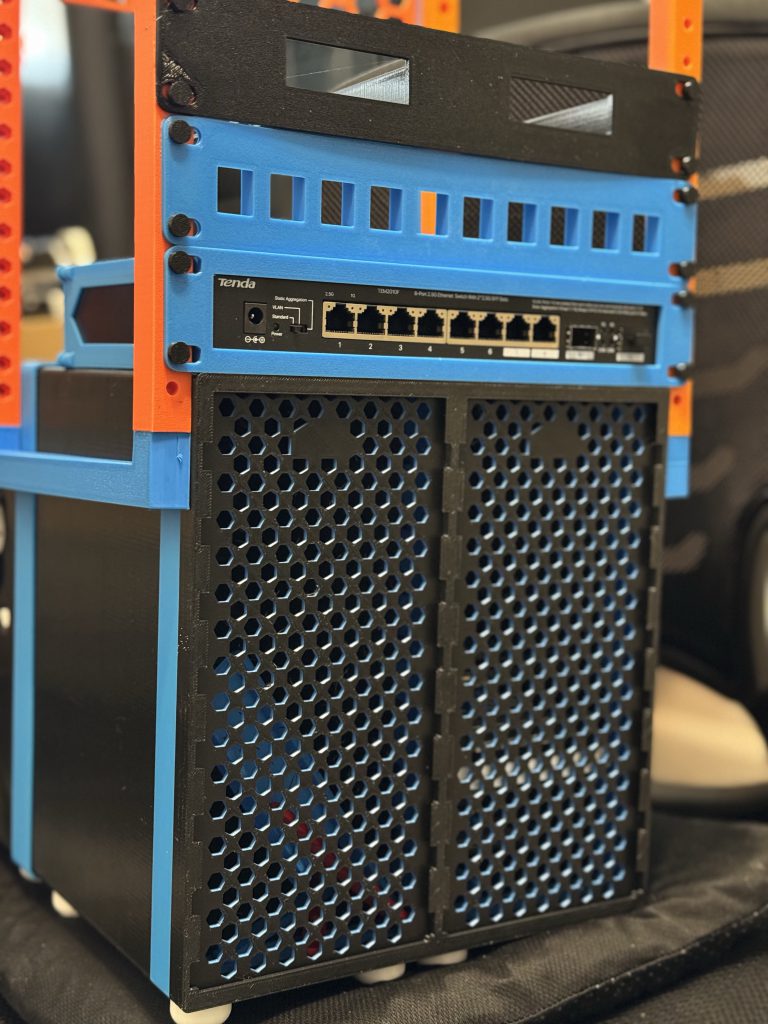
Well you’re in luck! PillarMax, completely unintentionally, fits perfectly inside a 10-inch mini rack (at least the one I printed), so that should be great news for those in this situation… 🙂 Hyper-dense 16-bay NAS right inside your rack!
Enjoy your 16-Bay PillarMax NAS!

Kudos for creative design. What’s the performance of this setup?
I’d imagine that 16 disks over one PCI-E lane might hit some limits.
Did you run some perf tests of this setup?
I am looking at building this awesome PillaxMax NAS you have designed using an older Lenovo laptop as the brain; AMD A12 with 8gb RAM (system max). It dose not have a M.2. It dose have 1 SATA and 1 ODD SATA. Current thought is to convert the ODD SATA to SATA (adapters easily available) for the boot drive and then the 2.5″ HDD SATA converted to a M.2 which is then converted to PCIE for the SAS card.
Questions:
Will this work? speed issues (+100mb/s)? reliability problems? Other than not using a mini PC plan to use the same HDD boards, SAS board, power distribution (maybe as I have a few 24V power supplies left over from some printers I scrapped so minor modifications maybe), …
Do you know if I can root this Lenovo and get tureNAS to run? Some googling says maybe but wondering if you have any insight or others have gotten into some stuff that could be of use to me.
How did you manage to connect the SAS card into the PCI-E adapter with that plastic piece blocking the end of it? Did you dremel it out or just snip it?
I have read quite a bit on this general theme lately, but the way you have organized these specific points stands out as one of the most clear and well-organized overviews I have come across in a very long time.
купить inmode Lumecca
I enjoy how this post keeps the discussion informative and easygoing at the same time because it makes the overall content more enjoyable to read.
site de paris sportif hors arjel
I think the best part about this post is the balanced and respectful way the ideas are shared, because it creates a positive atmosphere for discussion and makes the content feel more genuine, relatable, and enjoyable to read carefully.
casino en ligne avec retrait instantane